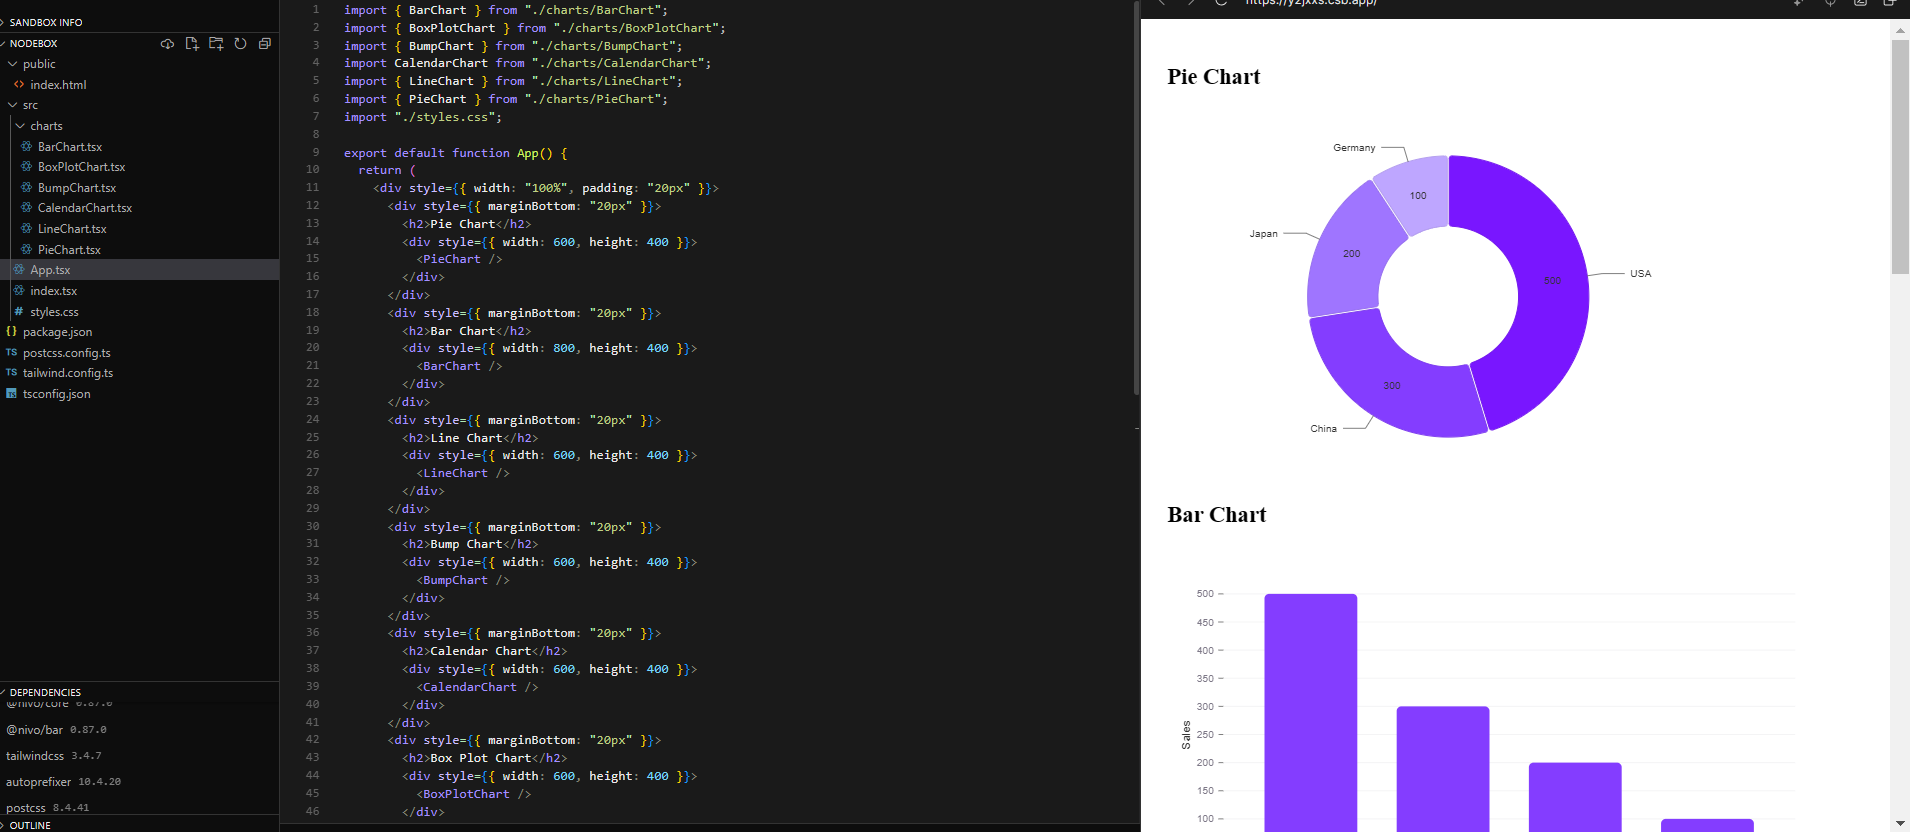
Mastering Nivo Charts: A Comprehensive Guide to Data Visualization
Create stunning data visualizations with Nivo: examples, customization, and more
Hello, data enthusiasts!
Are you ready to transform your data into stunning, interactive visualizations? Look no further than Nivo, a powerful charting library that allows you to create beautiful, responsive charts with ease.
In this blog, we’ll explore some of the most popular chart types available in Nivo, including Bar charts, Pie charts, Line charts, Bump charts, Calendar charts, and Box plots. We’ll provide practical examples for each chart type, complete with interactive CodeSandbox links that allow you to experiment with different styles and configurations.
Each example provided here is built using React. Whether you're working with a standard React project or a Next.js application, these examples will help you create stunning charts with ease.
Why Choose Nivo?
Nivo offers a wide range of chart types, built-in interactivity, and customizable styles, making it a go-to choice for developers looking to create dynamic data visualizations. Here are some key reasons to choose Nivo:
Rich Variety of Charts: Nivo supports numerous chart types, including Bar charts, Pie charts, Line charts, Bump charts, Calendar charts, Choropleth maps, and Box plots.
Highly Customizable: You can customize every aspect of your charts, from colors and labels to tooltips.
Responsive Design: Nivo charts are designed to be responsive, ensuring they look great on any device.
Interactive Elements: Add interactivity to your charts with tooltips, hover effects, and clickable elements.
Let’s explore some of the most popular chart types in Nivo with examples and custom styles.
1. Bar Chart
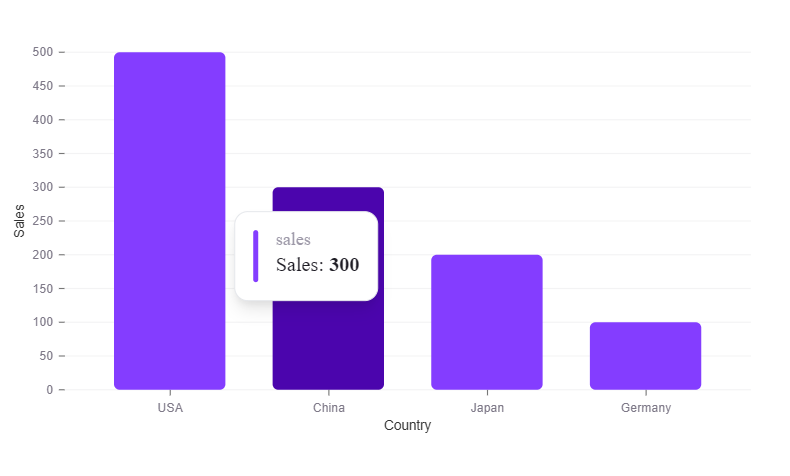
Overview: Bar charts are a staple for comparing categorical data. They use rectangular bars to represent different values, making it easy to see and compare quantities across categories.
Use Cases: Ideal for visualizing sales by region, product performance, or survey responses. They are straightforward and effective for displaying data trends and comparisons.
Key Features:
Horizontal or vertical bars
Customizable bar colors and spacing
Easily interpretable for most audiences
Installation
To begin, you need to install the Nivo packages required for the Bar chart. Run the following command in your React project:
npm install @nivo/core @nivo/bar
// If you're using Yarn, use this command:
yarn add @nivo/core @nivo/bar
Implementation
Now that you have Nivo installed, let's create a bar chart in React:
import React, { useState } from "react";
import { ResponsiveBar } from "@nivo/bar";

const data = [
  { country: "USA", sales: 500 },
  { country: "China", sales: 300 },
  { country: "Japan", sales: 200 },
  { country: "Germany", sales: 100 },
];

export const BarChart = () => {
  const [hoveredIndex, setHoveredIndex] = useState<number | null>(null);

  return (
    <ResponsiveBar
      data={data}
      keys={["sales"]}
      indexBy="country"
      label="false"
      borderRadius={5}
      margin={{ top: 50, right: 130, bottom: 50, left: 60 }}
      padding={0.3}
      colors={({ index }) => (index === hoveredIndex ? "#4b05ad" : "#843DFF")}
      animate={true}
      axisBottom={{
        tickSize: 5,
        tickPadding: 5,
        tickRotation: 0,
        legend: "Country",
        legendPosition: "middle",
        legendOffset: 32,
      }}
      axisLeft={{
        tickSize: 5,
        tickPadding: 5,
        tickRotation: 0,
        legend: "Sales",
        legendPosition: "middle",
        legendOffset: -40,
      }}
      onMouseEnter={(data) => {
        setHoveredIndex(data.index);
      }}
      onMouseLeave={() => {
        setHoveredIndex(null);
      }}
      tooltip={({ id, value }) => (
        <div
          style={{
            borderRadius: "0.75rem",
            border: "1px solid #e5e7eb",
            backgroundColor: "#ffffff",
            padding: "1rem",
            boxShadow:
              "0 10px 15px -3px rgba(0, 0, 0, 0.1), 0 4px 6px -2px rgba(0, 0, 0, 0.05)",
          }}
        >
          <div
            style={{
              display: "flex",
              alignItems: "center",
              gap: "1rem",
            }}
          >
            <div
              style={{
                width: "0.25rem",
                borderRadius: "0.25rem",
                alignSelf: "stretch",
                backgroundColor: "#843dff",
              }}
            ></div>
            <div style={{ flex: 1 }}>
              <strong
                style={{
                  display: "block",
                  fontWeight: 500,
                  fontSize: "1rem",
                  lineHeight: "1rem",
                  color: "#9d99a8",
                }}
              >
                {id}
              </strong>
              <span
                style={{
                  fontSize: "1.125rem",
                  lineHeight: "1.875rem",
                  color: "#1e1c24",
                }}
              >
                Sales: <span style={{ fontWeight: 600 }}>{value}</span>
              </span>
            </div>
          </div>
        </div>
      )}
      theme={{
        axis: {
          ticks: {
            text: {
              fill: "#7E7988",
            },
          },
        },
        grid: {
          line: {
            stroke: "#F3F3F4",
            strokeWidth: 1,
          },
        },
      }}
    />
  );
};
Check Out the
Code Sandbox: Explore interactive examples of Bar Chartshere.Customize the bars, change colors, and see how different data sets look!
2. Pie Chart
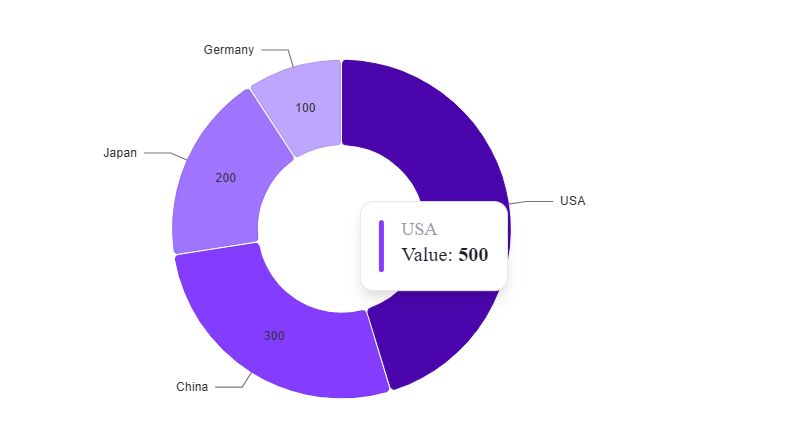
Overview: Pie charts are used to show the proportion of different categories as slices of a whole. Each slice represents a category’s contribution to the total.
Use Cases: Perfect for illustrating market share, budget allocation, or composition of a whole. They provide a clear picture of how individual parts make up the entire dataset.
Key Features:
Slices can be labeled or have tooltips
Customizable colors and slice sizes
Effective for displaying percentage-based data
Installation
For the Pie chart, you'll need to install the following Nivo packages:
npm install @nivo/core @nivo/pie
//If you're using Yarn:
yarn add @nivo/core @nivo/pie
Implementation
Here's how to implement a Pie chart in React:
import React, { useState } from "react";
import { ResponsivePie } from "@nivo/pie";

interface PieData {
  id: string;
  value: number;
}

const data: PieData[] = [
  { id: "USA", value: 500 },
  { id: "China", value: 300 },
  { id: "Japan", value: 200 },
  { id: "Germany", value: 100 },
];

export const PieChart: React.FC = () => {
  const [hoveredId, setHoveredId] = useState<string | null>(null);
  const getColor = (id: string) => {
    const colors: Record<string, string> = {
      USA: "#7916ff",
      China: "#843dff",
      Japan: "#9f75ff",
      Germany: "#bea6ff",
    };
    return colors[id] || "#843DFF";
  };

  return (
    <ResponsivePie
      data={data}
      margin={{ top: 50, right: 50, bottom: 50, left: 50 }}
      innerRadius={0.5}
      padAngle={0.7}
      cornerRadius={3}
      colors={({ id }) => (id === hoveredId ? "#4b05ad" : getColor(id))}
      borderWidth={1}
      borderColor={{ from: "color", modifiers: [["darker", 0.2]] }}
      radialLabel={(d) => `${d.id}: ${d.value}`}
      sliceLabel={(d) => `${d.value}`}
      animate={true}
      motionConfig="slow"
      onMouseEnter={({ id }) => setHoveredId(id)}
      onMouseLeave={() => setHoveredId(null)}
      tooltip={({ datum }) => (
        <div
          style={{
            borderRadius: "0.75rem",
            border: "1px solid #e5e7eb",
            backgroundColor: "#ffffff",
            padding: "1rem",
            boxShadow:
              "0 10px 15px -3px rgba(0, 0, 0, 0.1), 0 4px 6px -2px rgba(0, 0, 0, 0.05)",
          }}
        >
          <div
            style={{
              display: "flex",
              alignItems: "center",
              gap: "1rem",
            }}
          >
            <div
              style={{
                width: "0.25rem",
                borderRadius: "0.25rem",
                alignSelf: "stretch",
                backgroundColor: "#843dff",
              }}
            ></div>
            <div style={{ flex: 1 }}>
              <strong
                style={{
                  display: "block",
                  fontWeight: 500,
                  fontSize: "1rem",
                  lineHeight: "1rem",
                  color: "#9d99a8",
                }}
              >
                {datum.id}
              </strong>
              <span
                style={{
                  fontSize: "1.125rem",
                  lineHeight: "1.875rem",
                  color: "#1e1c24",
                }}
              >
                Value: <span style={{ fontWeight: 600 }}>{datum.value}</span>
              </span>
            </div>
          </div>
        </div>
      )}
      theme={{
        legends: {
          text: {
            fontSize: 14,
            fill: "#7E7988",
          },
        },
      }}
    />
  );
};
Check Out the
Code Sandbox:Dive into interactive Pie Chart examplehere.Adjust the slice sizes, colors, and labels to fit your data!
3. Line Chart
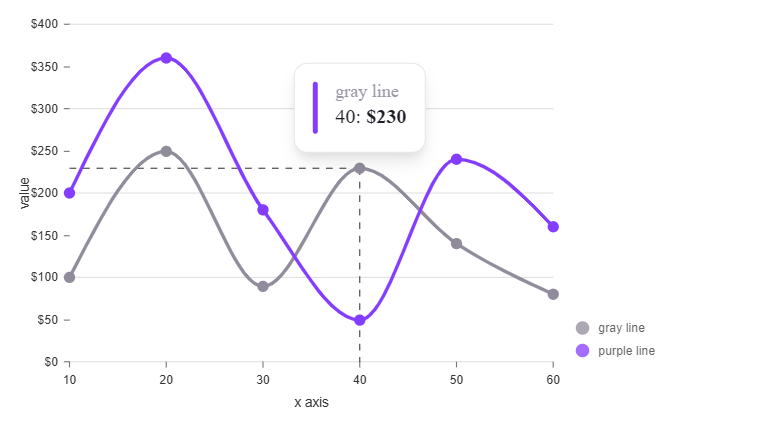
Overview: Line charts are used to display trends over time. They connect data points with lines, making it easy to track changes and identify patterns.
Use Cases: Suitable for visualizing stock prices, website traffic, or temperature changes over time. They are great for showing how a value evolves.
Key Features:
Multiple lines for comparing different datasets
Interactive features like tooltips and zooming
Clear trend representation over time
Installation
To create a Line chart, install the necessary packages:
npm install @nivo/core @nivo/line
// For Yarn:
yarn add @nivo/core @nivo/line
Implementation
Here's a basic example of a Line chart:
import { ResponsiveLine } from "@nivo/line";

const data = [
  {
    id: "purple line",
    color: "#843DFF",
    data: [
      { x: 10, y: 200 },
      { x: 20, y: 360 },
      { x: 30, y: 180 },
      { x: 40, y: 50 },
      { x: 50, y: 240 },
      { x: 60, y: 160 },
    ],
  },
  {
    id: "gray line",
    color: "#908C9B",
    data: [
      { x: 10, y: 100 },
      { x: 20, y: 250 },
      { x: 30, y: 90 },
      { x: 40, y: 230 },
      { x: 50, y: 140 },
      { x: 60, y: 80 },
    ],
  },
];

export const LineChart = () => (
  <div style={{ height: "400px", width: "100%" }}>
    <ResponsiveLine
      data={data}
      margin={{ top: 50, right: 110, bottom: 50, left: 60 }}
      xScale={{ type: "point" }}
      yScale={{
        type: "linear",
        min: 0,
        max: 400,
        stacked: false,
        reverse: false,
      }}
      yFormat=" >-$d"
      curve="monotoneX"
      axisTop={null}
      axisRight={null}
      axisBottom={{
        tickSize: 5,
        tickPadding: 5,
        tickRotation: 0,
        legend: "x axis",
        legendOffset: 36,
        legendPosition: "middle",
      }}
      axisLeft={{
        tickSize: 5,
        tickPadding: 5,
        tickRotation: 0,
        legend: "value",
        legendOffset: -40,
        legendPosition: "middle",
        format: (v) => `$${v}`,
      }}
      enableGridX={false}
      colors={(d) => d.color}
      lineWidth={3}
      pointSize={10}
      pointColor={{ from: "color" }}
      pointBorderWidth={2}
      pointBorderColor={{ theme: "background" }}
      pointLabelYOffset={-12}
      useMesh={true}
      gridYValues={[0, 100, 200, 300, 400]}
      theme={{
        grid: {
          line: {
            stroke: "#e0e0e0",
            strokeWidth: 1,
          },
        },
        axis: {
          domain: {
            line: {
              stroke: "transparent",
            },
          },
        },
      }}
      defs={[
        {
          id: "dashed",
          type: "patternLines",
          background: "inherit",
          color: "hsl(0, 0%, 70%)",
          rotation: -45,
          lineWidth: 2,
          spacing: 5,
        },
      ]}
      tooltip={({ point }) => (
        <div
          style={{
            borderRadius: "0.75rem",
            border: "1px solid #e5e7eb",
            backgroundColor: "#ffffff",
            padding: "1rem",
            boxShadow:
              "0 10px 15px -3px rgba(0, 0, 0, 0.1), 0 4px 6px -2px rgba(0, 0, 0, 0.05)",
          }}
        >
          <div
            style={{
              display: "flex",
              alignItems: "center",
              gap: "1rem",
            }}
          >
            <div
              style={{
                width: "0.25rem",
                borderRadius: "0.25rem",
                alignSelf: "stretch",
                backgroundColor: "#843dff",
              }}
            ></div>
            <div style={{ flex: 1 }}>
              <strong
                style={{
                  display: "block",
                  fontWeight: 500,
                  fontSize: "1rem",
                  lineHeight: "1rem",
                  color: "#9d99a8",
                }}
              >
                {point.serieId}
              </strong>
              <span
                style={{
                  fontSize: "1.125rem",
                  lineHeight: "1.875rem",
                  color: "#1e1c24",
                }}
              >
                {point.data.xFormatted}:{" "}
                <span style={{ fontWeight: 600 }}>{point.data.yFormatted}</span>
              </span>
            </div>
          </div>
        </div>
      )}
      fill={[{ match: { id: "gray line" }, id: "dashed" }]}
      legends={[
        {
          anchor: "bottom-right",
          direction: "column",
          justify: false,
          translateX: 100,
          translateY: 0,
          itemsSpacing: 0,
          itemDirection: "left-to-right",
          itemWidth: 80,
          itemHeight: 20,
          itemOpacity: 0.75,
          symbolSize: 12,
          symbolShape: "circle",
          symbolBorderColor: "rgba(0, 0, 0, .5)",
          effects: [
            {
              on: "hover",
              style: {
                itemBackground: "rgba(0, 0, 0, .03)",
                itemOpacity: 1,
              },
            },
          ],
        },
      ]}
    />
  </div>
);
Check Out the
Code Sandbox: Check out live Line Chart exampleshere. Explore different line styles, colors, and data points!
4. Bump Chart
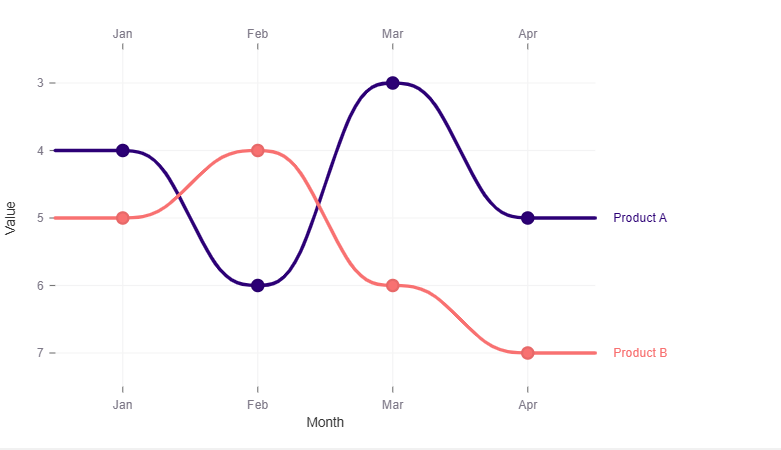
Overview: Bump charts are used to show rank changes over time. Each line represents a category, and the chart illustrates how its position shifts over time.
Use Cases: Useful for tracking changes in rankings, such as the performance of athletes, products, or market positions. They offer a dynamic view of rank progression.
Key Features:
Clear visualization of ranking changes
Customizable line styles and colors
Effective for showing relative position shifts
Installation
For the Bump chart, install the following packages:
npm install @nivo/core @nivo/bump
// For Yarn:
yarn add @nivo/core @nivo/bump
Implementation
Here's an example of a Bump chart in React:
import { ResponsiveBump } from "@nivo/bump";

interface BumpData {
  id: string;
  data: { x: string; y: number }[];
}

const data: BumpData[] = [
  {
    id: "Product A",
    data: [
      { x: "Jan", y: 4 },
      { x: "Feb", y: 6 },
      { x: "Mar", y: 3 },
      { x: "Apr", y: 5 },
    ],
  },
  {
    id: "Product B",
    data: [
      { x: "Jan", y: 5 },
      { x: "Feb", y: 4 },
      { x: "Mar", y: 6 },
      { x: "Apr", y: 7 },
    ],
  },
];

export const BumpChart: React.FC = () => {
  // Define colors for each line
  const getColor = (id: string) => {
    const colors: Record<string, string> = {
      "Product A": "#2c0076",
      "Product B": "#f87171",
    };
    return colors[id] || "#843DFF";
  };

  return (
    <ResponsiveBump
      data={data}
      margin={{ top: 50, right: 70, bottom: 50, left: 50 }}
      colors={({ id }) => getColor(id)}
      lineWidth={3}
      pointSize={10}
      pointBorderWidth={2}
      pointBorderColor={{ from: "color", modifiers: [["darker", 0.2]] }}
      useMesh={true}
      axisBottom={{
        tickSize: 5,
        tickPadding: 5,
        tickRotation: 0,
        legend: "Month",
        legendOffset: 32,
        legendPosition: "middle",
      }}
      axisLeft={{
        tickSize: 5,
        tickPadding: 5,
        tickRotation: 0,
        legend: "Value",
        legendOffset: -40,
        legendPosition: "middle",
      }}
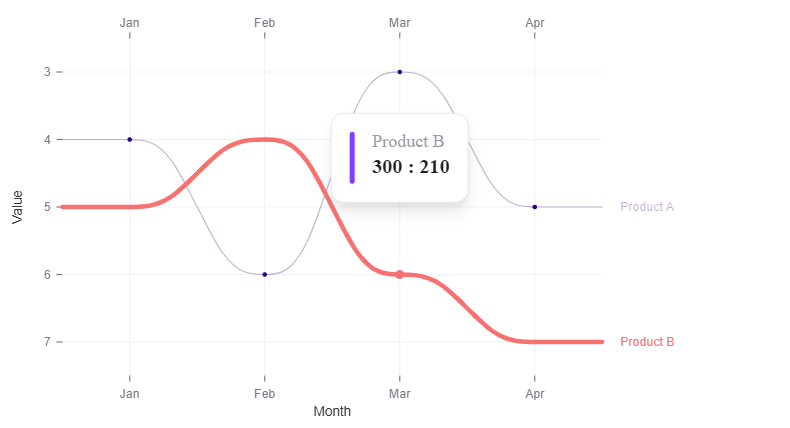
      pointTooltip={({ point }) => {
        return (
          <div
            style={{
              borderRadius: "0.75rem",
              border: "1px solid #e5e7eb",
              backgroundColor: "#ffffff",
              padding: "1rem",
              boxShadow:
                "0 10px 15px -3px rgba(0, 0, 0, 0.1), 0 4px 6px -2px rgba(0, 0, 0, 0.05)",
            }}
          >
            <div
              style={{
                display: "flex",
                alignItems: "center",
                gap: "1rem",
              }}
            >
              <div
                style={{
                  width: "0.25rem",
                  borderRadius: "0.25rem",
                  alignSelf: "stretch",
                  backgroundColor: "#843dff",
                }}
              ></div>
              <div style={{ flex: 1 }}>
                <strong
                  style={{
                    display: "block",
                    fontWeight: 500,
                    fontSize: "1rem",
                    lineHeight: "1rem",
                    color: "#9d99a8",
                  }}
                >
                  {point.serie.id}
                </strong>
                <span
                  style={{
                    fontSize: "1.125rem",
                    lineHeight: "1.875rem",
                    color: "#1e1c24",
                    fontWeight: 600,
                  }}
                >
                  {point.x} : {point.y}
                </span>
              </div>
            </div>
          </div>
        );
      }}
      theme={{
        axis: {
          ticks: {
            text: {
              fill: "#7E7988",
            },
          },
        },
        grid: {
          line: {
            stroke: "#F3F3F4",
            strokeWidth: 1,
          },
        },
      }}
    />
  );
};
Check Out the
Code Sandbox:Explore Bump Chart exampleshere. Play around with different rankings and see how they change over time!
5. Calendar Chart
Overview: Calendar charts visualize data over time using a calendar format. Each cell represents a time unit (day, week), and the color intensity represents the data value.
Use Cases: Ideal for displaying daily activity levels, heatmaps of user interactions, or frequency of events. They help in identifying patterns and anomalies over time.
Key Features:
Calendar grid layout with color-coded cells
Customizable date ranges and color scales
Insightful for time-based data analysis
Installation
For a Calendar chart, you'll need:
npm install @nivo/core @nivo/calendar
// For Yarn:
yarn add @nivo/core @nivo/calendar
Implementation
Here’s a Calendar chart example:
import React from "react";
import { ResponsiveCalendar } from "@nivo/calendar";

interface CalendarData {
  day: string;
  value: number;
}

const data: CalendarData[] = [
  { day: "2024-01-01", value: 12 },
  { day: "2024-01-02", value: 15 },
  { day: "2024-01-03", value: 15 },
  { day: "2024-02-04", value: 20 },
  { day: "2024-02-04", value: 10 },
  { day: "2024-03-23", value: 12 },
  { day: "2024-04-04", value: 20 },
  { day: "2024-04-04", value: 28 },
  { day: "2024-05-20", value: 24 },
  { day: "2024-06-14", value: 20 },
  // Add more data points as needed
];

const CalendarChart: React.FC = () => {
  const getColor = (value: number) => {
    if (value > 20) return "#15803d"; // High value color
    if (value > 10) return "#22c55e"; // Medium value color
    return "#4ade80"; // Low value color
  };

  return (
    <ResponsiveCalendar
      data={data}
      from="2024-01-01"
      to="2024-12-31"
      emptyColor="#eeeeee"
      colors={data.map(({ value }) => getColor(value))}
      margin={{ top: 10, right: 10, bottom: 10, left: 20 }}
      dayBorderWidth={2}
      dayBorderColor="#ffffff"
      monthBorderColor="#ffffff"
      yearLegendWidth={60}
      monthLegendHeight={20}
      dayLegendFormat="%d"
      tooltip={({ day, value }) => (
        <div
          style={{
            borderRadius: "0.75rem",
            border: "1px solid #e5e7eb",
            backgroundColor: "#ffffff",
            padding: "1rem",
            boxShadow:
              "0 10px 15px -3px rgba(0, 0, 0, 0.1), 0 4px 6px -2px rgba(0, 0, 0, 0.05)",
          }}
        >
          <div
            style={{
              display: "flex",
              alignItems: "center",
              gap: "1rem",
            }}
          >
            <div
              style={{
                width: "0.25rem",
                borderRadius: "0.25rem",
                alignSelf: "stretch",
                backgroundColor: "#4ade80",
              }}
            ></div>
            <div style={{ flex: 1 }}>
              <strong
                style={{
                  display: "block",
                  fontWeight: 500,
                  fontSize: "1rem",
                  lineHeight: "1rem",
                  color: "#9d99a8",
                }}
              >
                {new Date(day).toDateString()}
              </strong>
              <span
                style={{
                  fontSize: "1.125rem",
                  lineHeight: "1.875rem",
                  color: "#1e1c24",
                }}
              >
                Value: <span style={{ fontWeight: 600 }}>{value}</span>
              </span>
            </div>
          </div>
        </div>
      )}
      theme={{
        axis: {
          ticks: {
            text: {
              fill: "#7E7988",
            },
          },
        },
        grid: {
          line: {
            stroke: "#F3F3F4",
            strokeWidth: 1,
          },
        },
      }}
    />
  );
};

export default CalendarChart;

Check Out the
Code Sandbox:View Calendar Chart exampleshere.Customize the date ranges and color scales to visualize your data!
6. Box Plot Chart
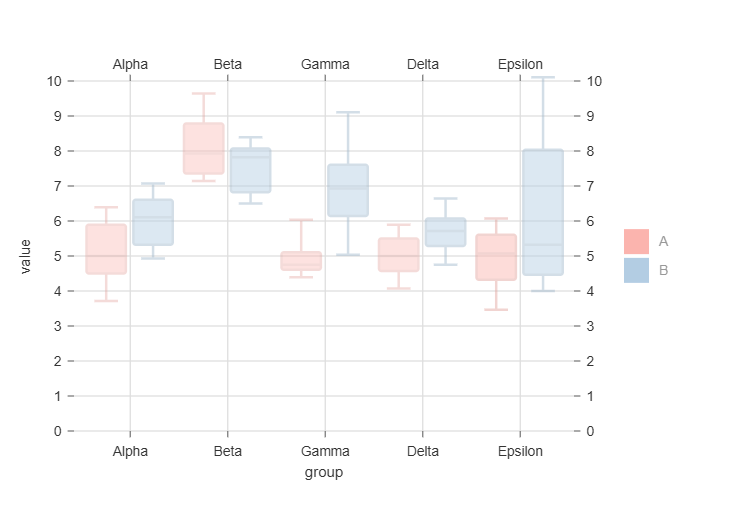
Overview: Box plot charts summarize data distributions through quartiles, median, and outliers. They provide a statistical summary of the data's spread and central tendency.
Use Cases: Useful for visualizing data distributions in datasets like test scores, survey results, or financial returns. They help in understanding data variability and outliers.
Key Features:
Visual representation of data quartiles and outliers
Customizable colors and box styles
Insightful for statistical data analysis
Installation
To create a Box plot chart, install:
npm install @nivo/core @nivo/boxplot
// For Yarn:
yarn add @nivo/core @nivo/boxplot
Implementation
Here’s an example:
import { ResponsiveBoxPlot } from "@nivo/boxplot";
//data is in sandbox
export const BoxPlotChart = () => {
  return (
    <ResponsiveBoxPlot
      data={data}
      margin={{ top: 60, right: 140, bottom: 60, left: 60 }}
      minValue={0}
      maxValue={10}
      subGroupBy="subgroup"
      padding={0.12}
      enableGridX={true}
      axisTop={{
        tickSize: 5,
        tickPadding: 5,
        tickRotation: 0,
        legend: "",
        legendOffset: 36,
        truncateTickAt: 0,
      }}
      axisRight={{
        tickSize: 5,
        tickPadding: 5,
        tickRotation: 0,
        legend: "",
        legendOffset: 0,
        truncateTickAt: 0,
      }}
      axisBottom={{
        tickSize: 5,
        tickPadding: 5,
        tickRotation: 0,
        legend: "group",
        legendPosition: "middle",
        legendOffset: 32,
        truncateTickAt: 0,
      }}
      axisLeft={{
        tickSize: 5,
        tickPadding: 5,
        tickRotation: 0,
        legend: "value",
        legendPosition: "middle",
        legendOffset: -40,
        truncateTickAt: 0,
      }}
      colors={{ scheme: "pastel1" }}
      opacity={0.4}
      borderRadius={2}
      borderWidth={2}
      borderColor={{
        from: "color",
        modifiers: [["darker", 0.3]],
      }}
      medianWidth={2}
      medianColor={{
        from: "color",
        modifiers: [["darker", 0.3]],
      }}
      whiskerEndSize={0.6}
      whiskerColor={{
        from: "color",
        modifiers: [["darker", 0.3]],
      }}
      motionConfig="stiff"
      legends={[
        {
          anchor: "right",
          direction: "column",
          justify: false,
          translateX: 100,
          translateY: 0,
          itemWidth: 60,
          itemHeight: 20,
          itemsSpacing: 3,
          itemTextColor: "#999",
          itemDirection: "left-to-right",
          symbolSize: 20,
          symbolShape: "square",
          effects: [
            {
              on: "hover",
              style: {
                itemTextColor: "#000",
              },
            },
          ],
        },
      ]}
    />
  );
};
Check Out the
Code Sandbox: Explore Box Plot Chart examplehere.Adjust box styles and colors to better represent your data distribution!
Conclusion
Nivo charts offer a versatile and powerful way to transform your raw data into visually stunning insights. From the classic Bar and Pie charts to the dynamic Bump and Calendar charts, Nivo provides the tools you need to create interactive and impactful data visualizations. By experimenting with the CodeSandbox examples, you can see firsthand how customization and interactivity can bring your data stories to life.
Here’s How You Can Take Your Data Visualization to the Next Level:
Dive into the Examples: Click on the interactive CodeSandbox links for each chart type to explore live examples. Adjust parameters, tweak designs, and see how different configurations impact your charts. These hands-on experiments will help you understand the full potential of Nivo and inspire new ideas for your projects.
Customize and Innovate: Don’t just stick with the default settings—get creative! Customize colors, adjust layouts, and incorporate unique interactivity options to make your charts truly stand out. Nivo’s extensive customization capabilities allow you to tailor visualizations to your specific needs, ensuring that they are both functional and visually appealing.
Share Your Creations: Have you created an amazing visualization with Nivo? Share it with your network and showcase the power of data storytelling. Whether through social media, professional networks, or your own blog, spreading your insights can inspire others and demonstrate the impact of effective data visualization.
Get Started Today!
Your journey into the world of Nivo doesn’t end here. Start exploring the interactive examples, experiment with customization, and share your results. Whether you’re working on a personal project or a professional presentation, Nivo’s capabilities will help you make data not only understandable but also captivating.
Thank you for joining in this exploration of Nivo charts. I am excited to see how you’ll use these tools to bring your data stories to life. Happy coding, and don’t forget to share this blog with your peers to spread the knowledge and inspire others!
We at CreoWis believe in sharing knowledge publicly to help the developer community grow. Let’s collaborate, ideate, and craft passion to deliver awe-inspiring product experiences to the world.
Let's connect:
This article is crafted by Chhakuli Zingare, a passionate developer at CreoWis. You can reach out to her on X/Twitter, LinkedIn, and follow her work on the GitHub.
