
AWS VPC : Unlocking Secure Cloud Networking with AWS
Your Step-by-Step Guide to Building a Secure VPC in AWS

Share this article
Amazon Virtual Private Cloud (VPC) is a fundamental service in the AWS arsenal, offering a secure and isolated virtual network environment for your cloud resources. This blog dives deep into the world of VPCs, exploring the underlying technology, step-by-step setup guide, and the compelling reasons to leverage it for your cloud deployments.
Why Move Away from Public IPs and Embrace VPCs?
While assigning a public IP address to an EC2 instance might seem convenient, it's often not the most secure or efficient approach. Here's why a VPC with private subnets is the preferred option:
Security Enhancement: Public IPs expose your instances directly to the internet, making them vulnerable to unauthorized access attempts. VPCs create a secure isolation layer, shielding your instances from the public internet and limiting access based on your security group rules. This significantly reduces the attack surface and strengthens your overall security posture.
Granular Control: With public IPs, you have limited control over inbound and outbound traffic. VPCs empower you to define granular security group rules, precisely controlling which ports and protocols can be accessed by your instances. This allows you to implement a principle of least privilege, minimizing potential security risks.
Cost Optimization: Public IP addresses can incur additional charges compared to private IP addresses within a VPC. By leveraging a NAT gateway for outbound internet access, you can optimize costs while maintaining secure communication.
Improved Network Management: Managing a collection of public IP addresses can become cumbersome and error-prone. VPCs provide a centralized and organized network environment, simplifying instance management and network configuration.
Scalability and Flexibility: When your infrastructure scales, managing a growing number of public IP addresses becomes complex. VPCs offer a more scalable solution. You can easily add subnets and resources within your VPC to accommodate growth, while maintaining a well-defined network structure.
By leveraging private subnets and security groups, you gain a greater degree of control over your network environment and bolster the security of your cloud resources.
Understanding the VPC: Building Blocks
At its core, a VPC functions like a virtual data center within the vast AWS cloud. It provides a logically isolated network segment where you can launch your resources like EC2 instances, databases, and more. This isolation strengthens security as your VPC resources are separated from other AWS accounts and virtual networks.
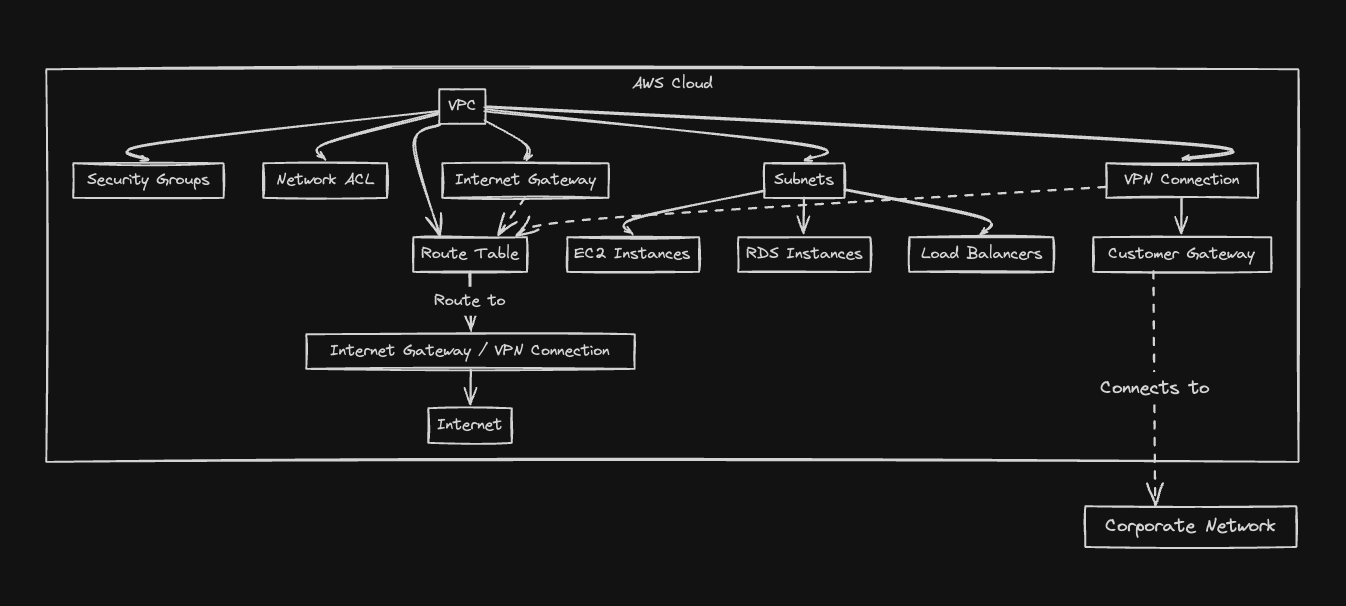
Here's a breakdown of the key VPC components:
IP Address Range: You define a private IP address range for your VPC, ensuring no conflicts with other networks.
Subnets: These are logical partitions within your VPC, similar to subnets in a traditional network. You can create subnets in specific Availability Zones (AZs) for redundancy and fault tolerance.
Security Groups: These act as firewalls, controlling inbound and outbound traffic for your resources based on security rules you define.
Route Tables: These dictate how traffic flows within your VPC, directing packets to the internet gateway (for internet access) or other VPCs through peering connections.
The Inner Workings: Under the Hood of VPC
While the core functionality is straightforward, understanding the underlying technology can be beneficial. VPCs leverage a technique called Virtual LAN (VLAN) tagging to isolate your network traffic. Each VPC resource is assigned a VLAN tag, ensuring it only communicates with other resources within the same VPC and configured security groups.
This isolation is achieved through hardware and software components within the AWS infrastructure. VPC endpoints further enhance security by allowing private connectivity between your VPC resources and specific AWS services without traversing the public internet.
Step-by-Step Guide: Building Your Secure VPC
1. Accessing the VPC Service:
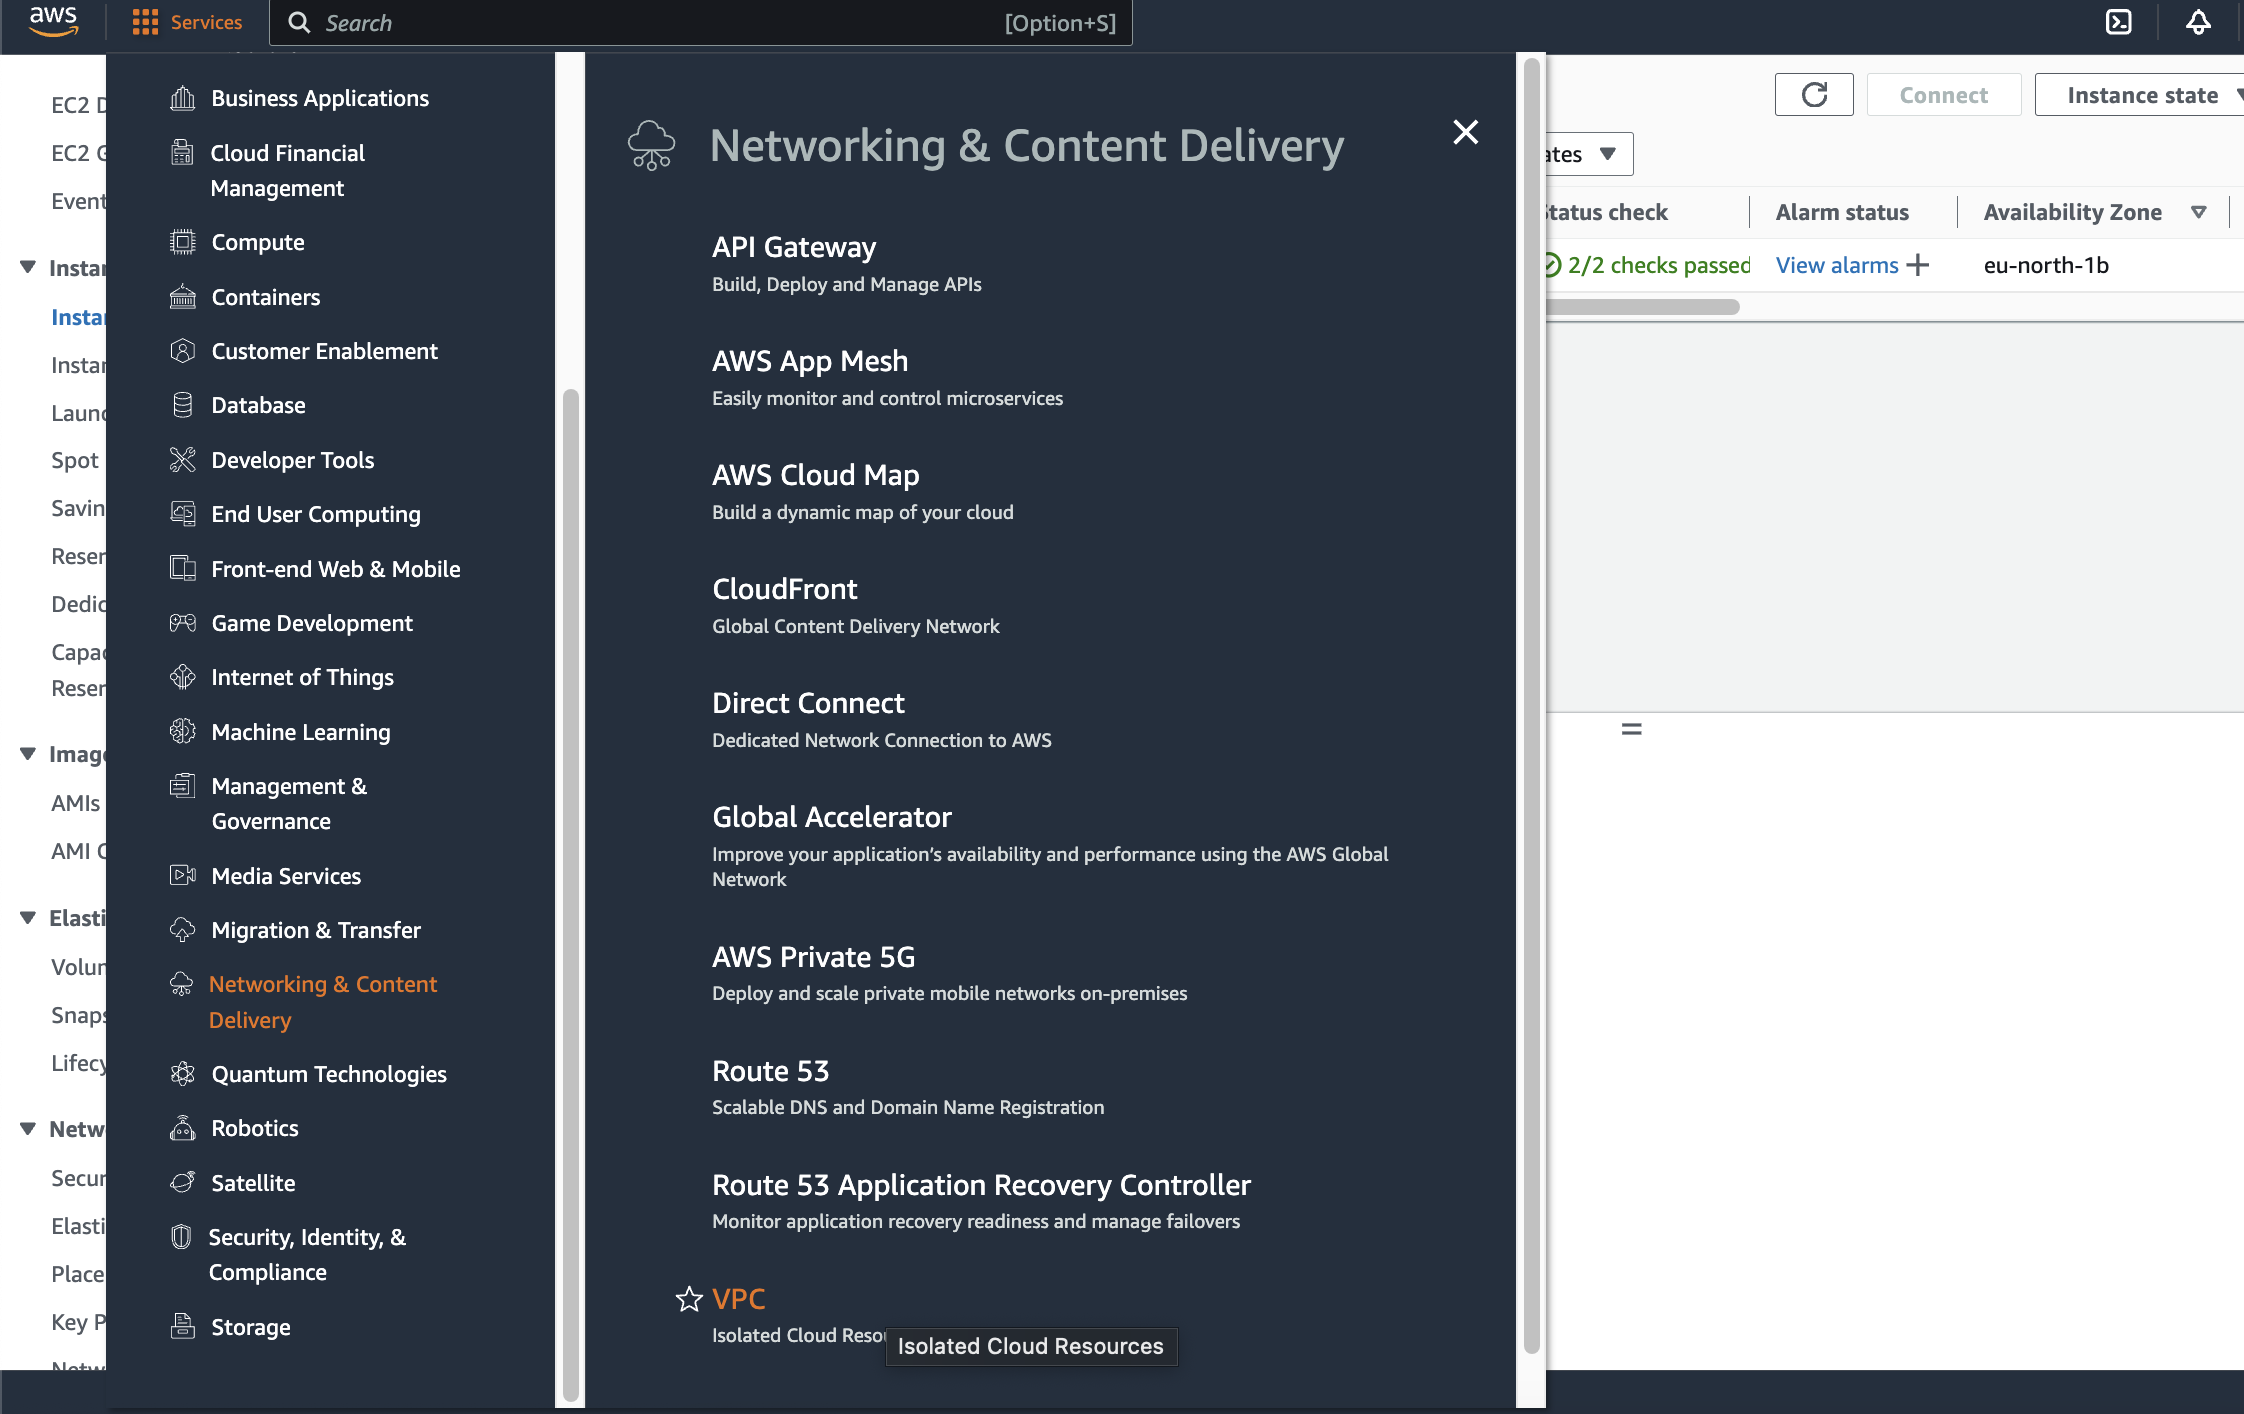
- Log in to the AWS Management Console and navigate to the VPC service. You can search for "VPC" in the search bar at the top of the console.
2. Creating Your VPC:
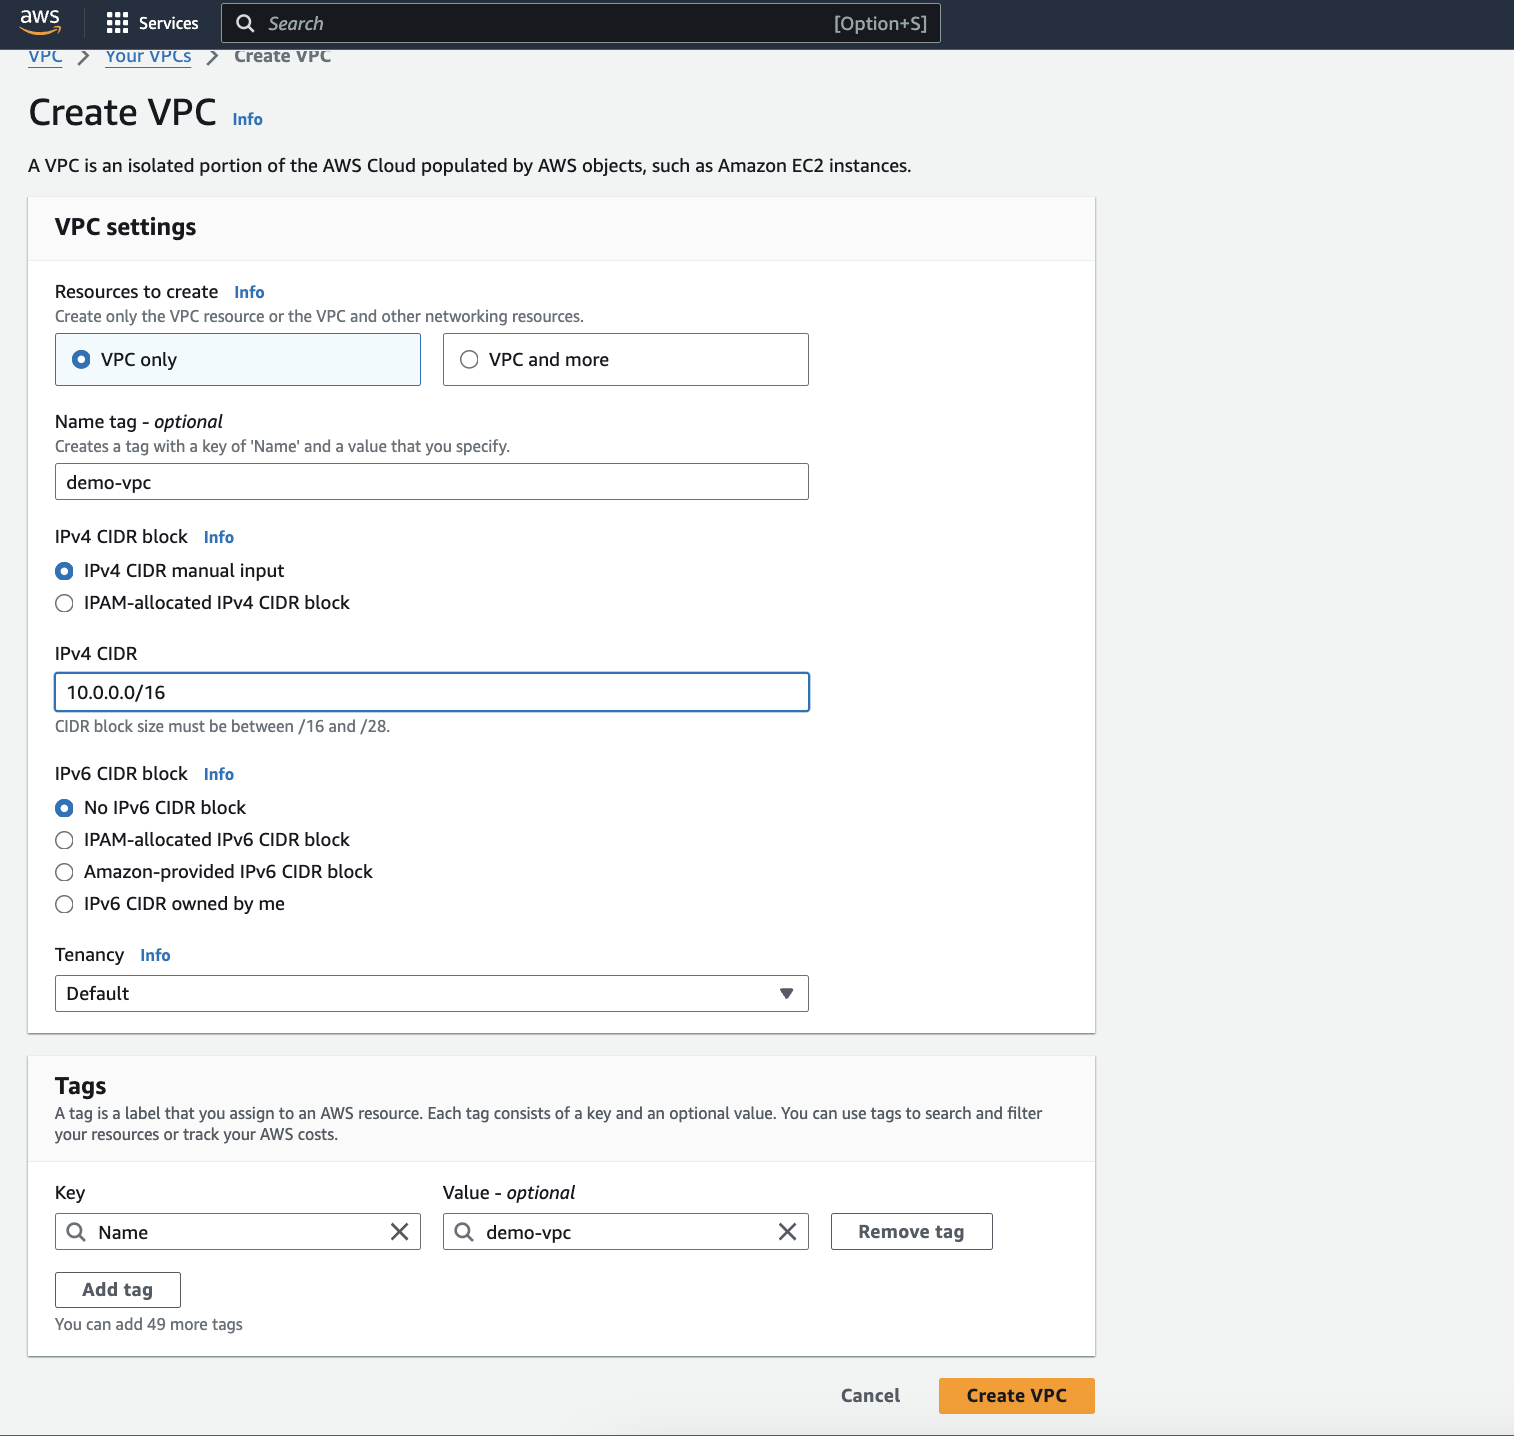
Click on the "Create VPC" button.
Choose a descriptive Name for your VPC (e.g., "demo-vpc").
Define an IPv4 CIDR block for your VPC. This is the private IP address range that will be used by resources within your VPC. Choose a block that is large enough to accommodate your current and future needs, but avoid selecting an unnecessarily large range to optimize resource utilization.
Select a Region for your VPC based on where you plan to deploy your resources. This ensures your resources are geographically close to your users or other services they interact with.
Click on "Create" to bring your VPC to life!
3. Defining Subnets:
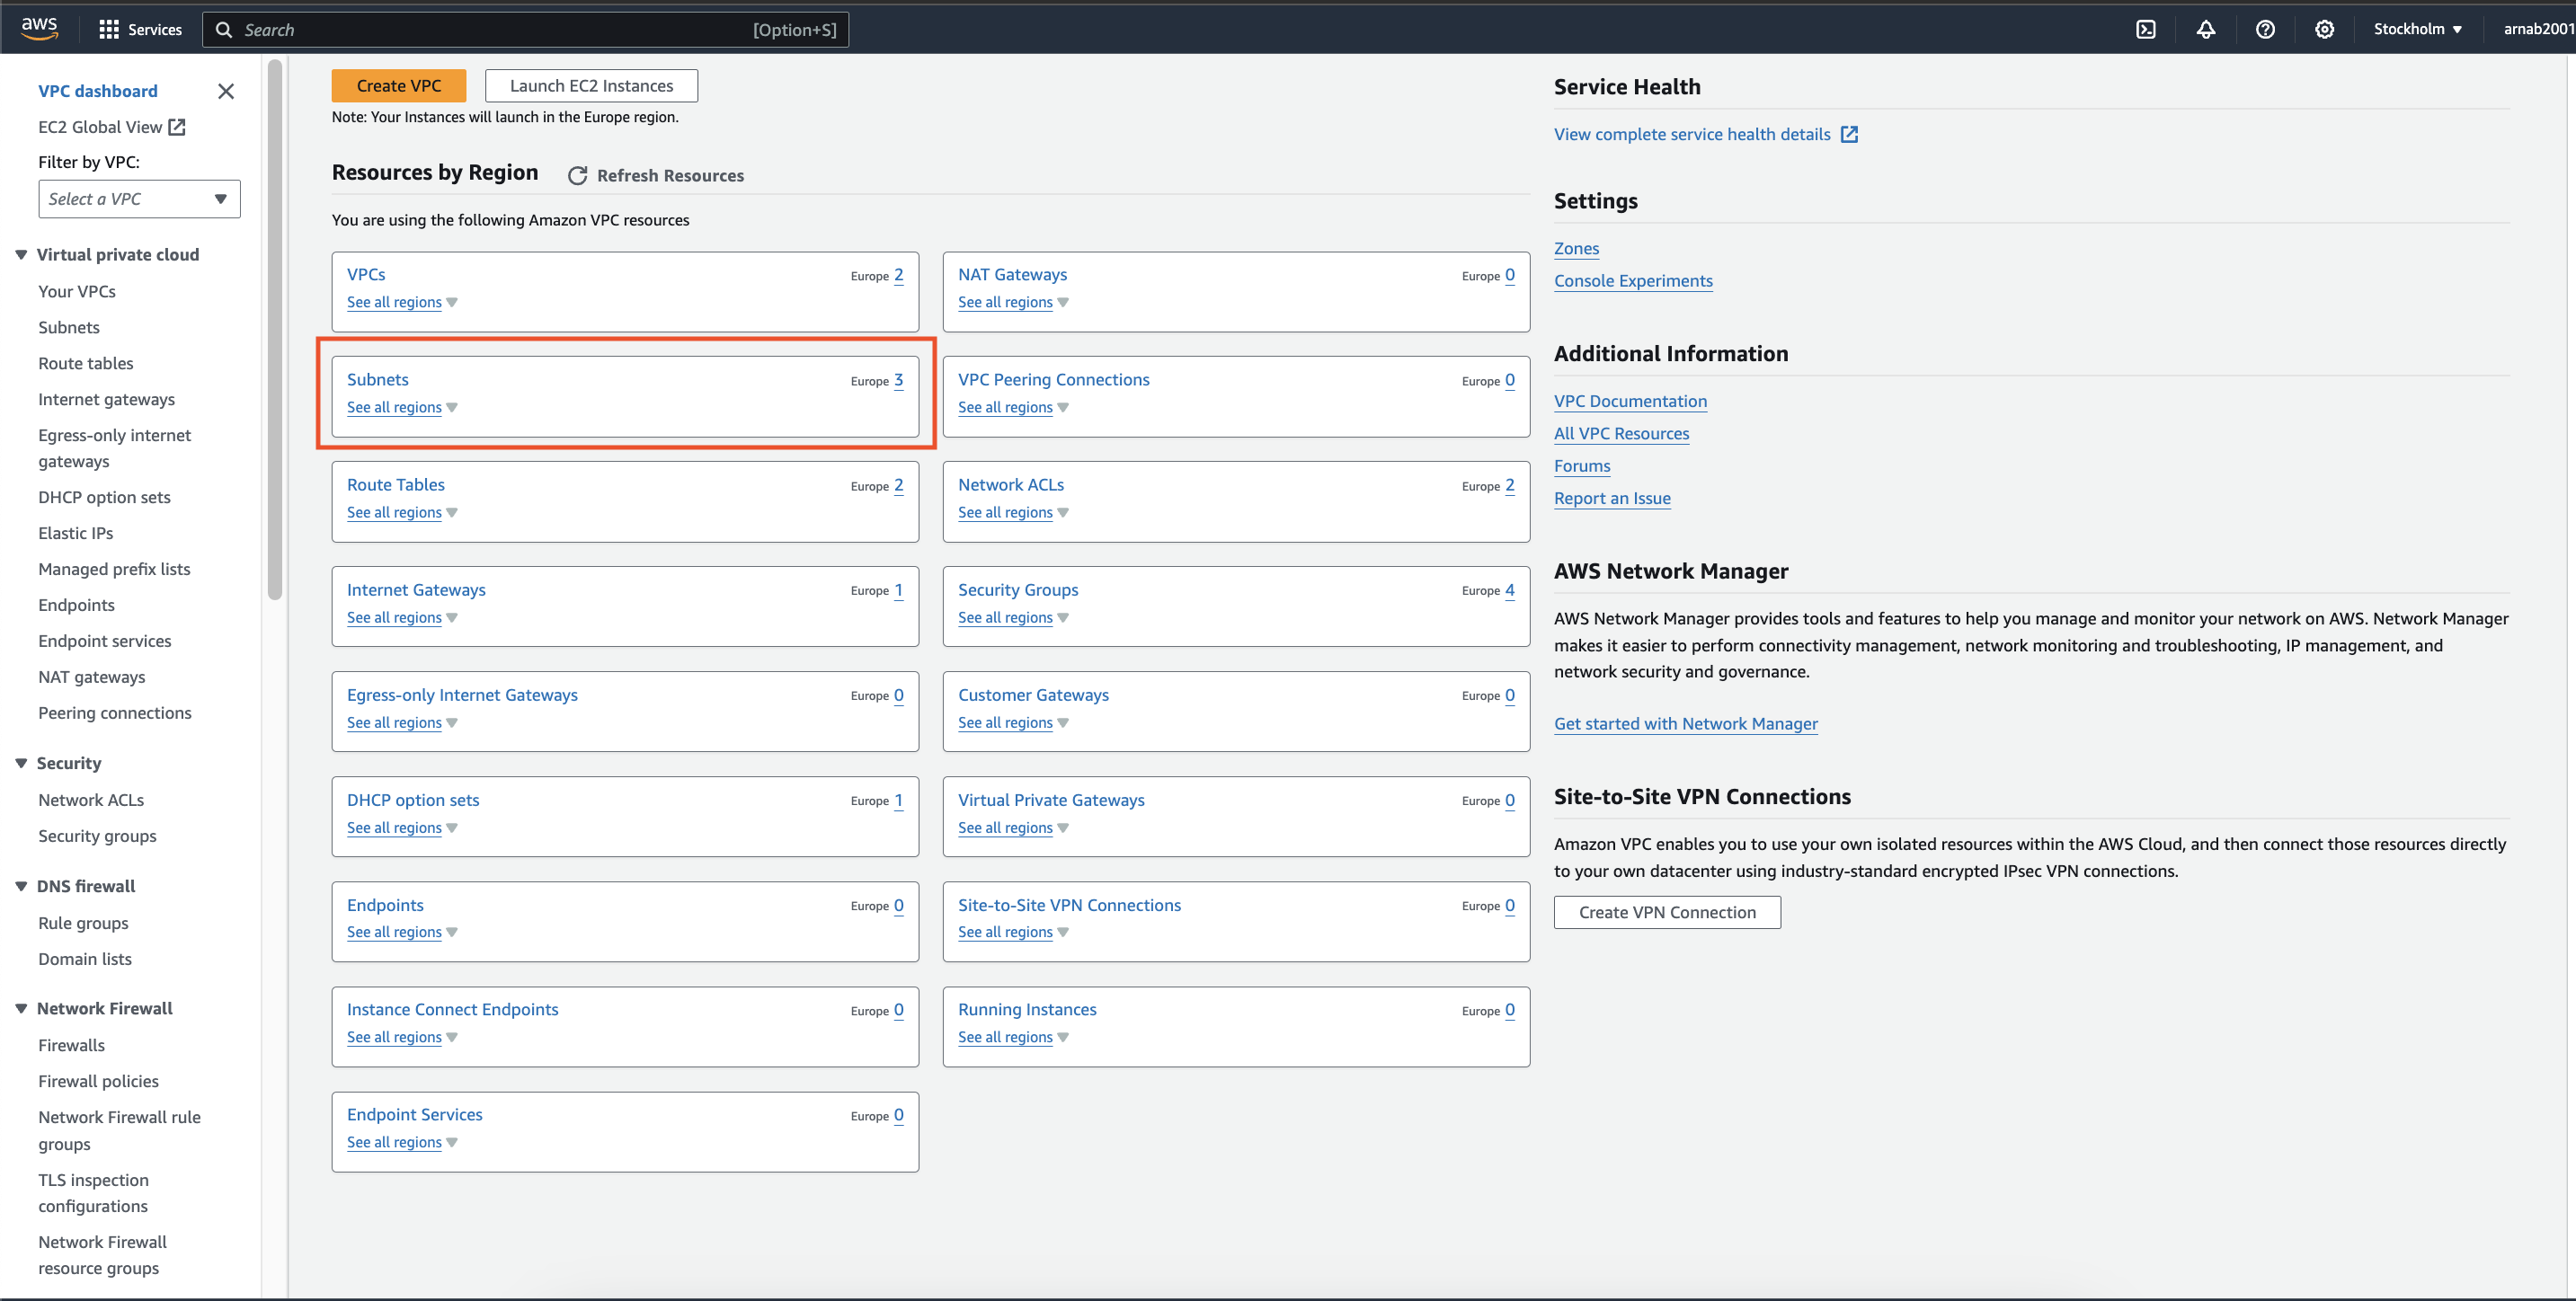
Within the VPC dashboard, navigate to the "Subnets" section.
Click on "Create subnet".
Choose a descriptive Name for your subnet (e.g., "PublicSubnet").
Define a CIDR block for your subnet. This will be a sub-range of the CIDR block you defined for your VPC.
Select an Availability Zone (AZ) within your chosen Region. Availability Zones are geographically separate locations within a Region, offering increased fault tolerance. Ideally, create subnets across multiple AZs for redundancy.
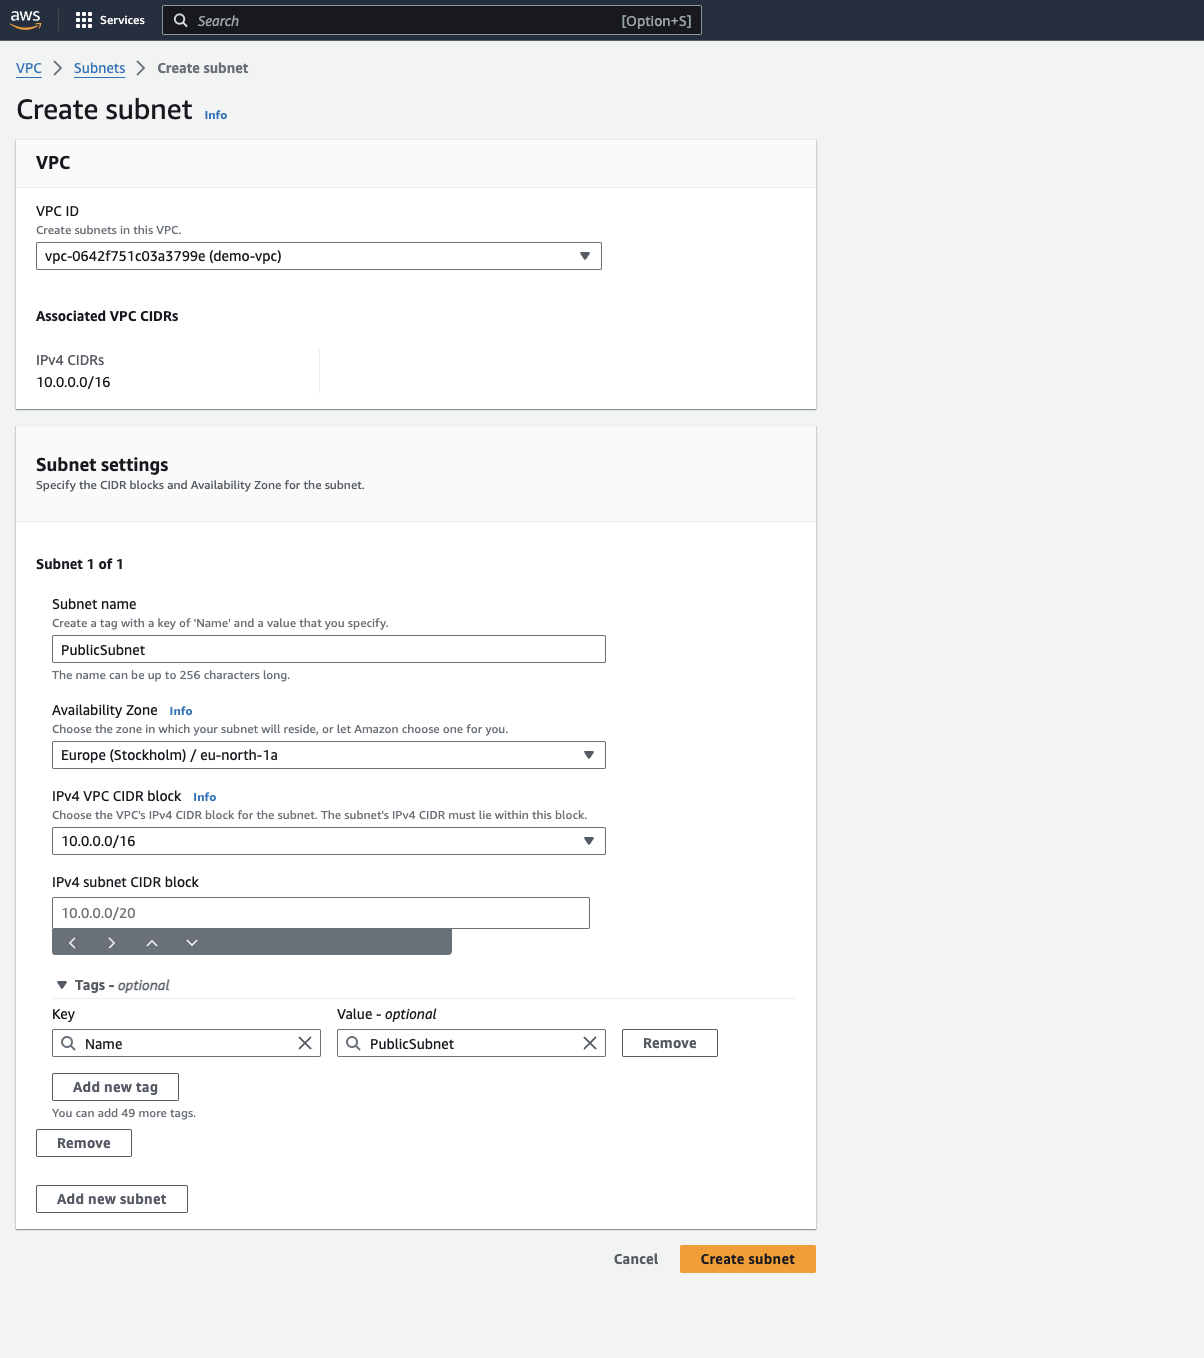
Click on "Create subnet" to establish your subnet. Repeat this process to create additional subnets, including private subnets for resources that don't require direct internet access.
4. Configuring Security Groups:
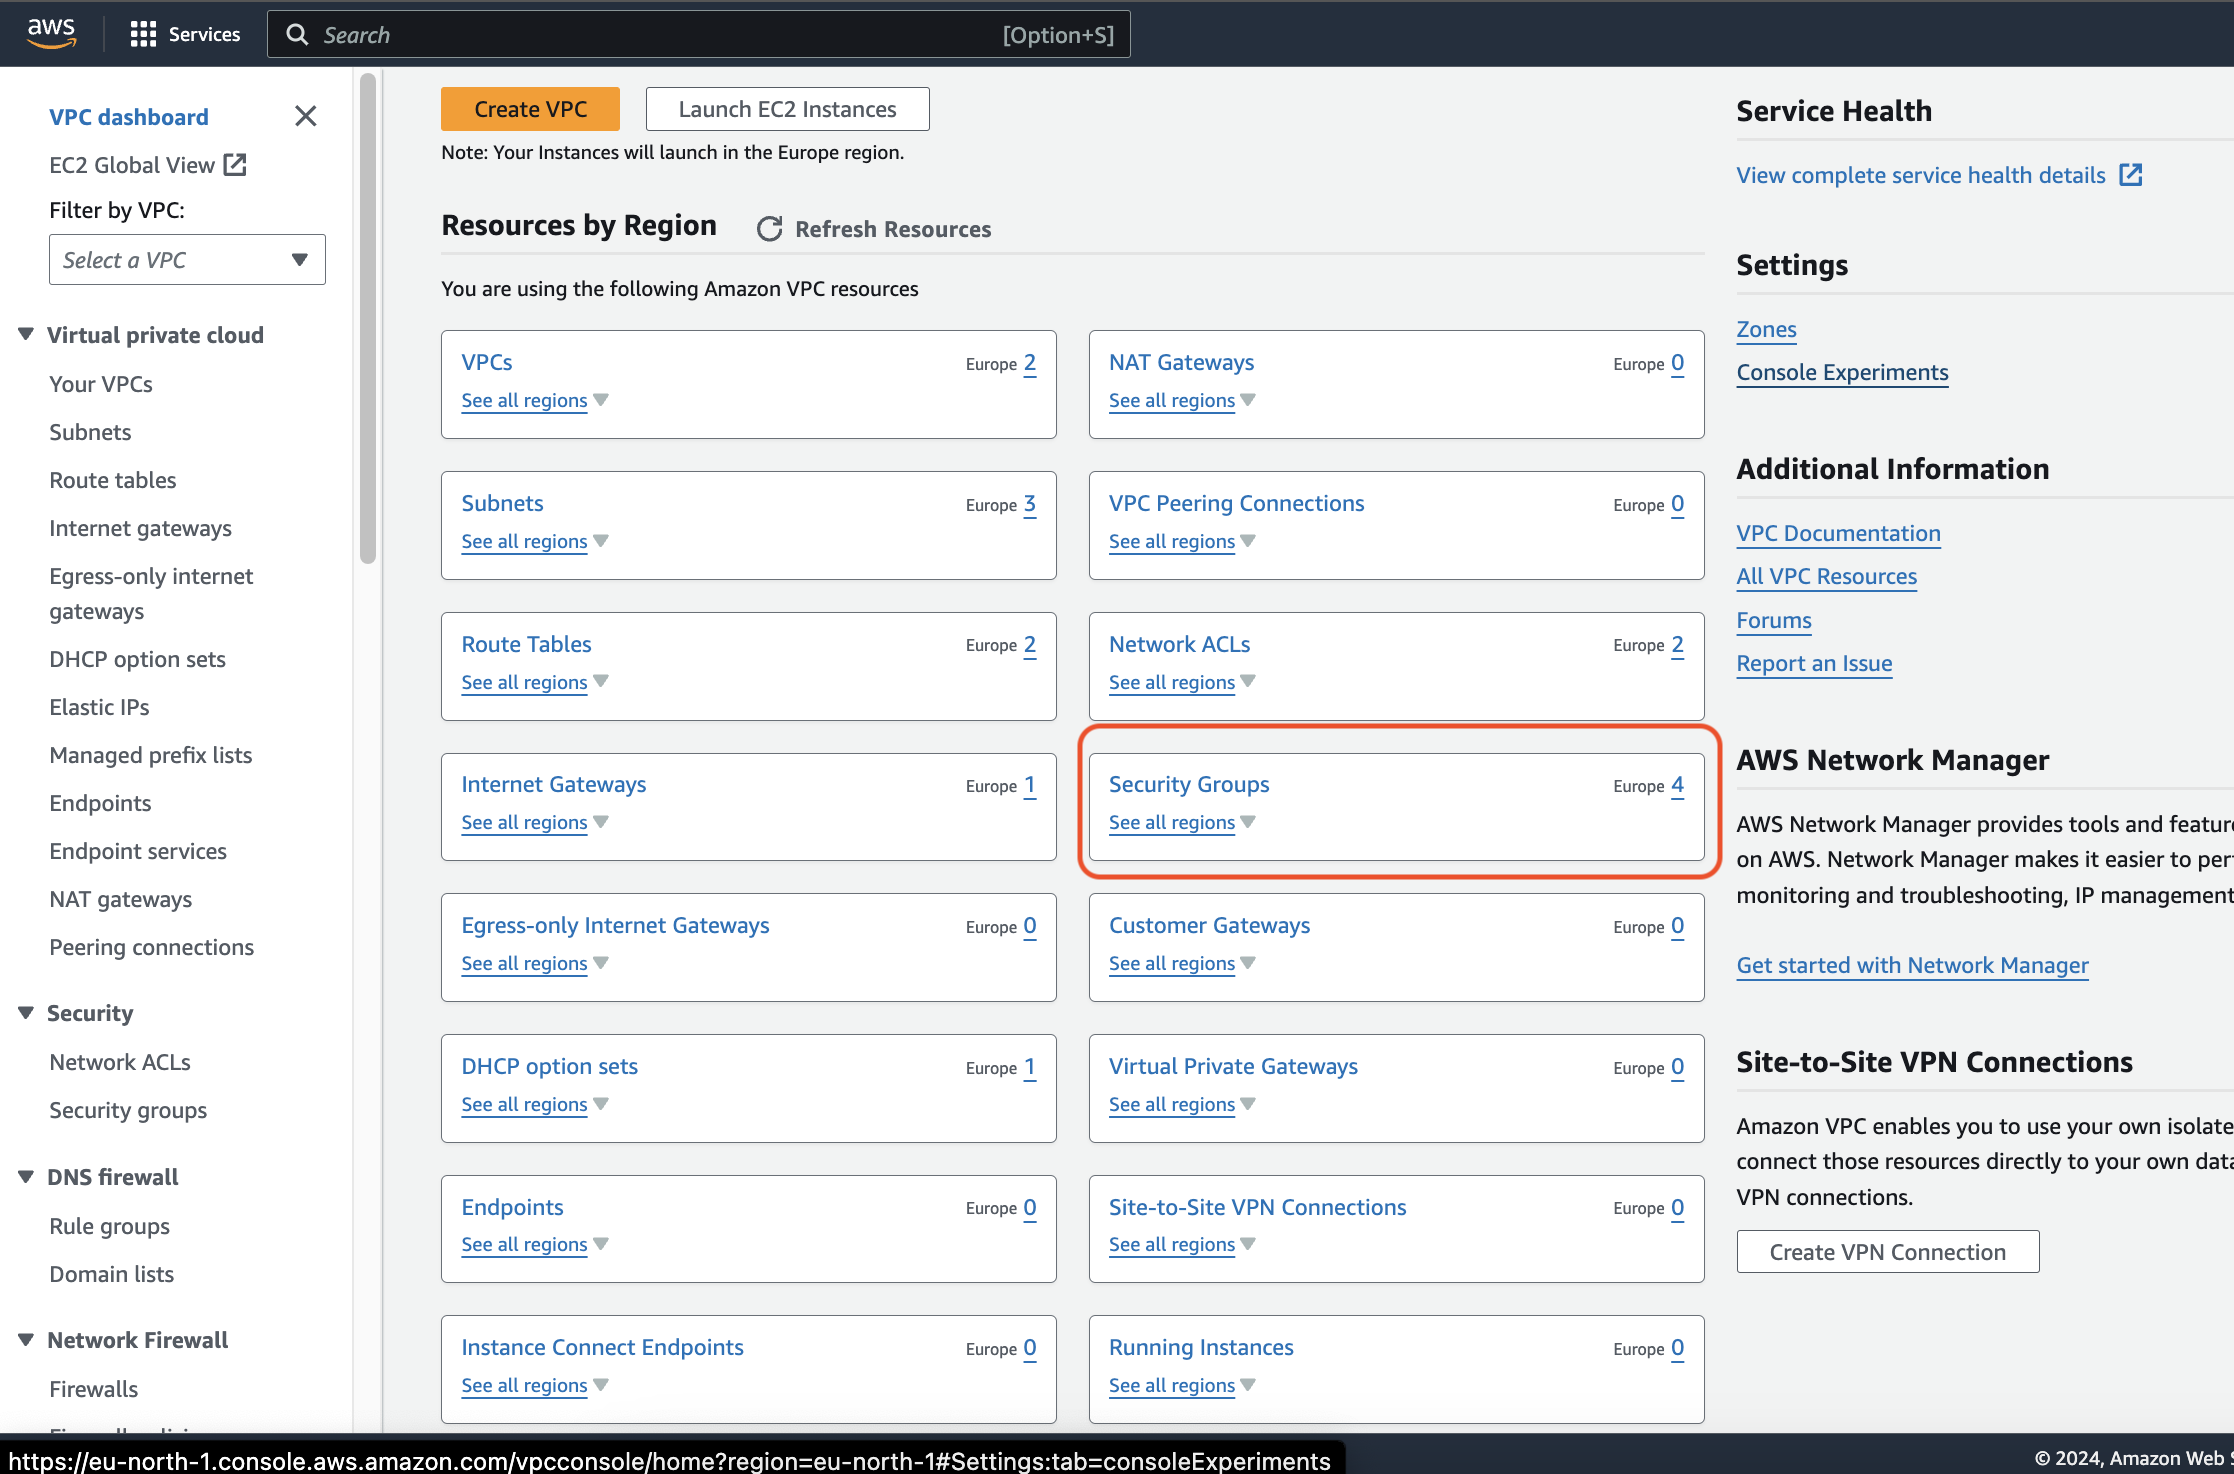
In the VPC dashboard, navigate to the "Security Groups" section.
Click on "Create security group".
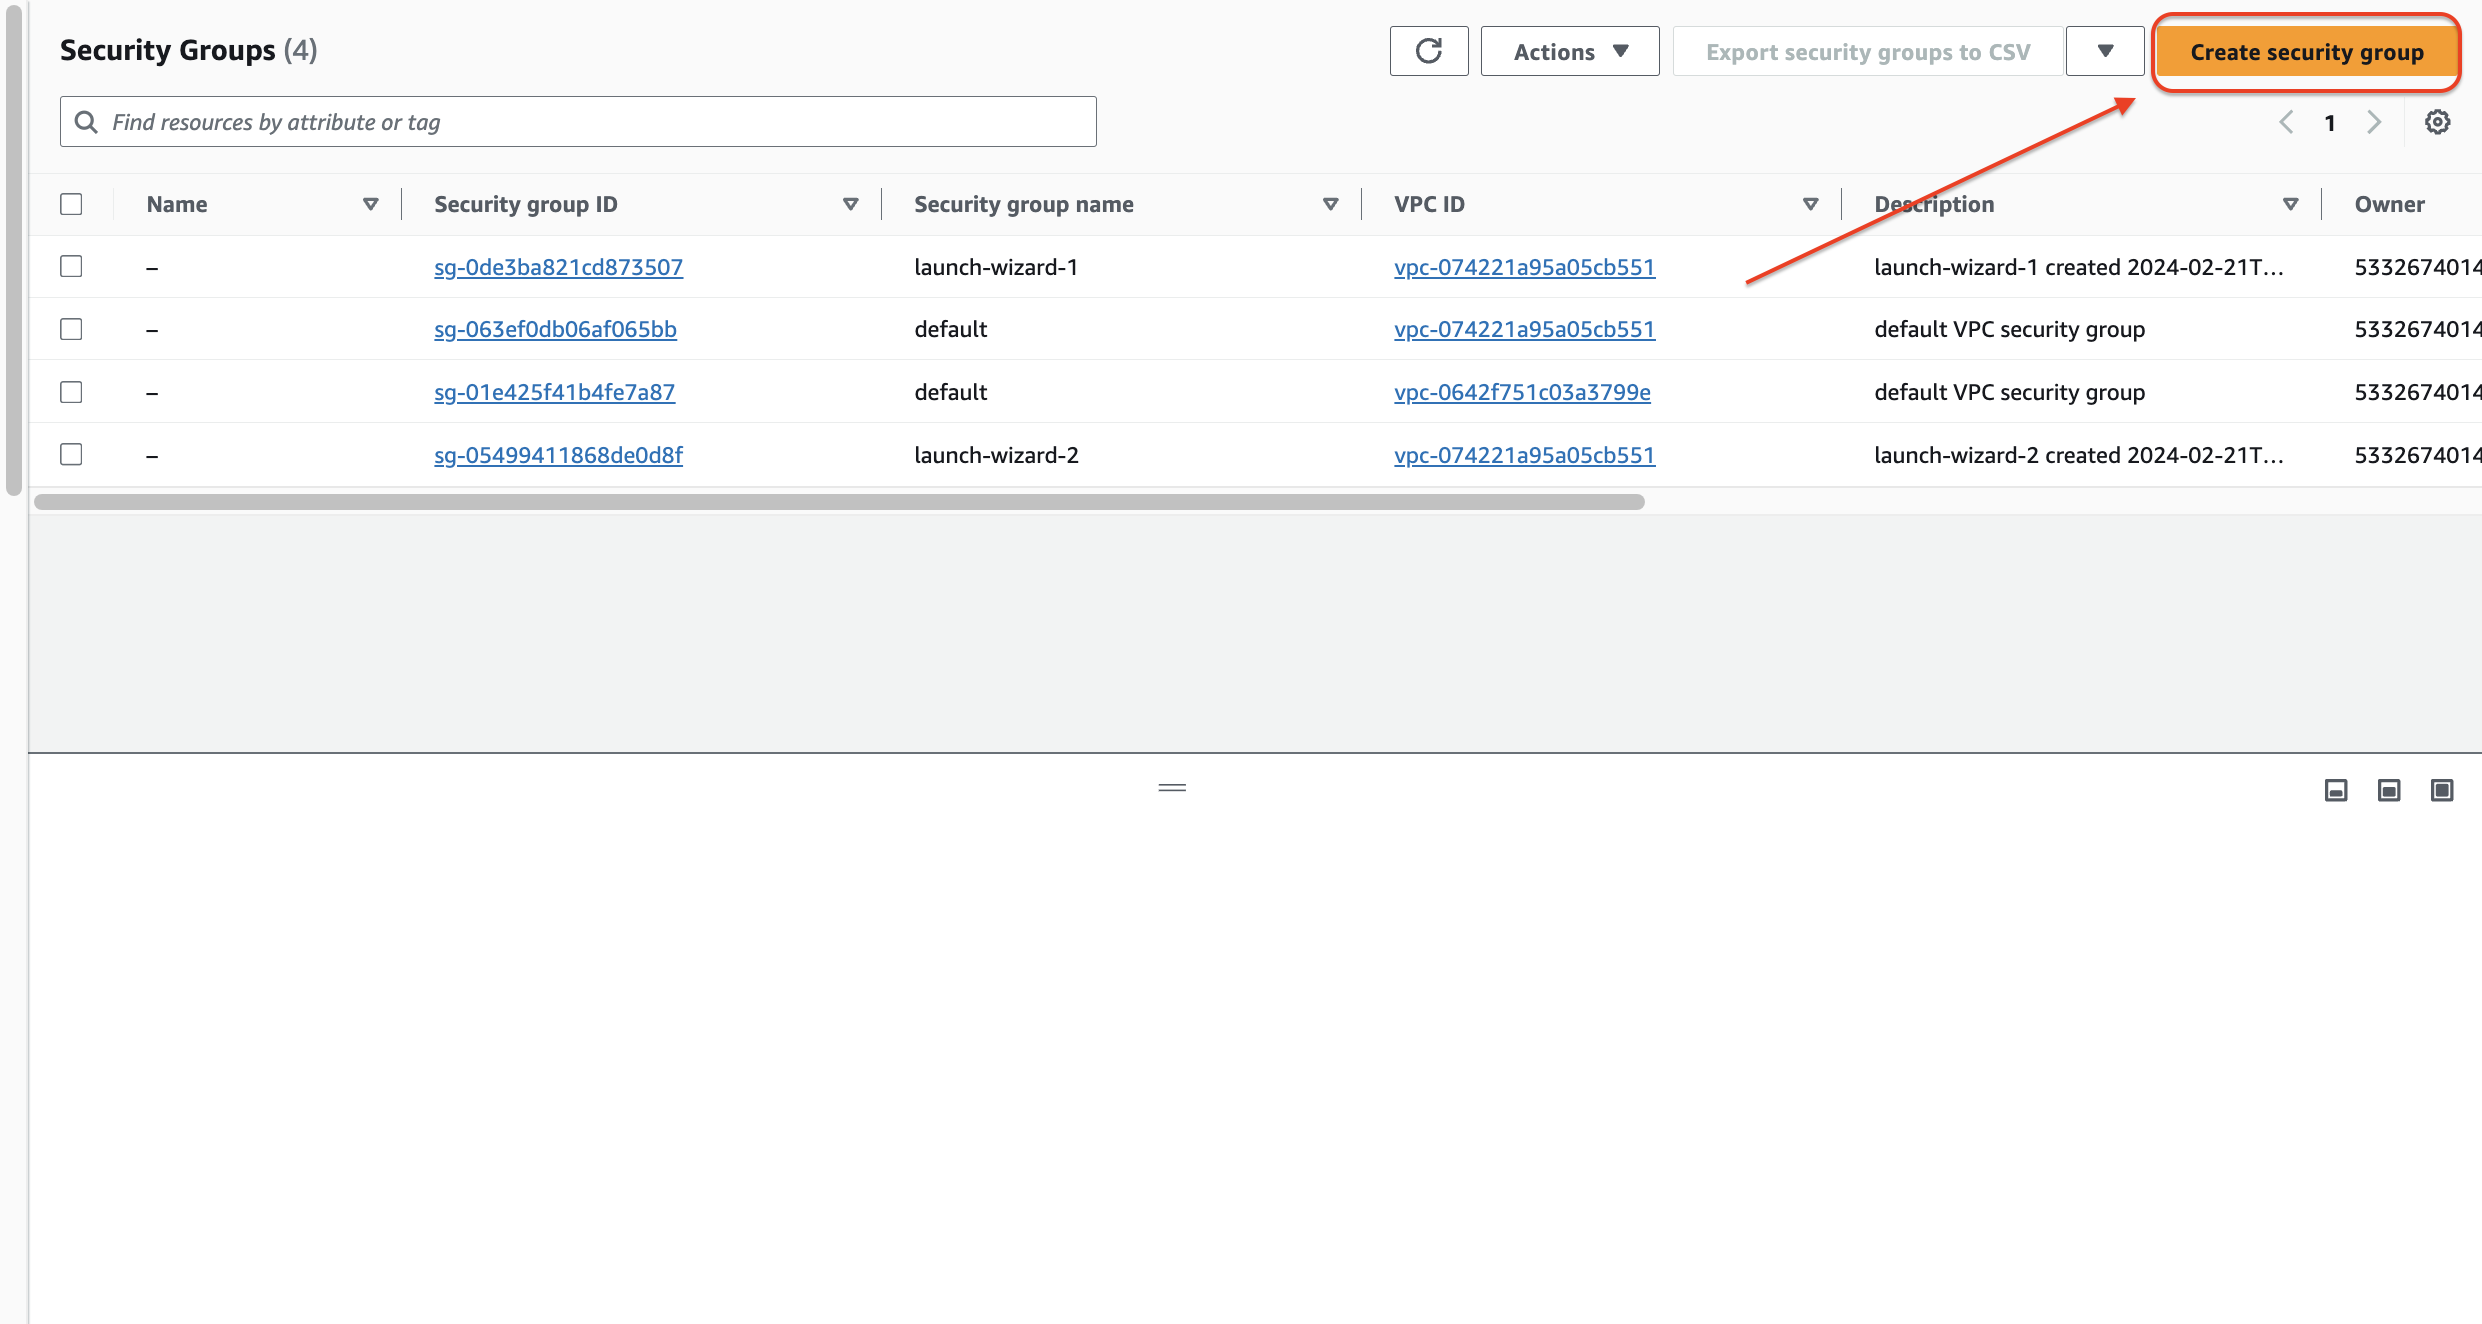
Provide a descriptive Name for your security group (e.g., "Web Server Security Group").
(Optional) Choose a VPC for the security group. By default, it will be associated with the VPC you've just created.
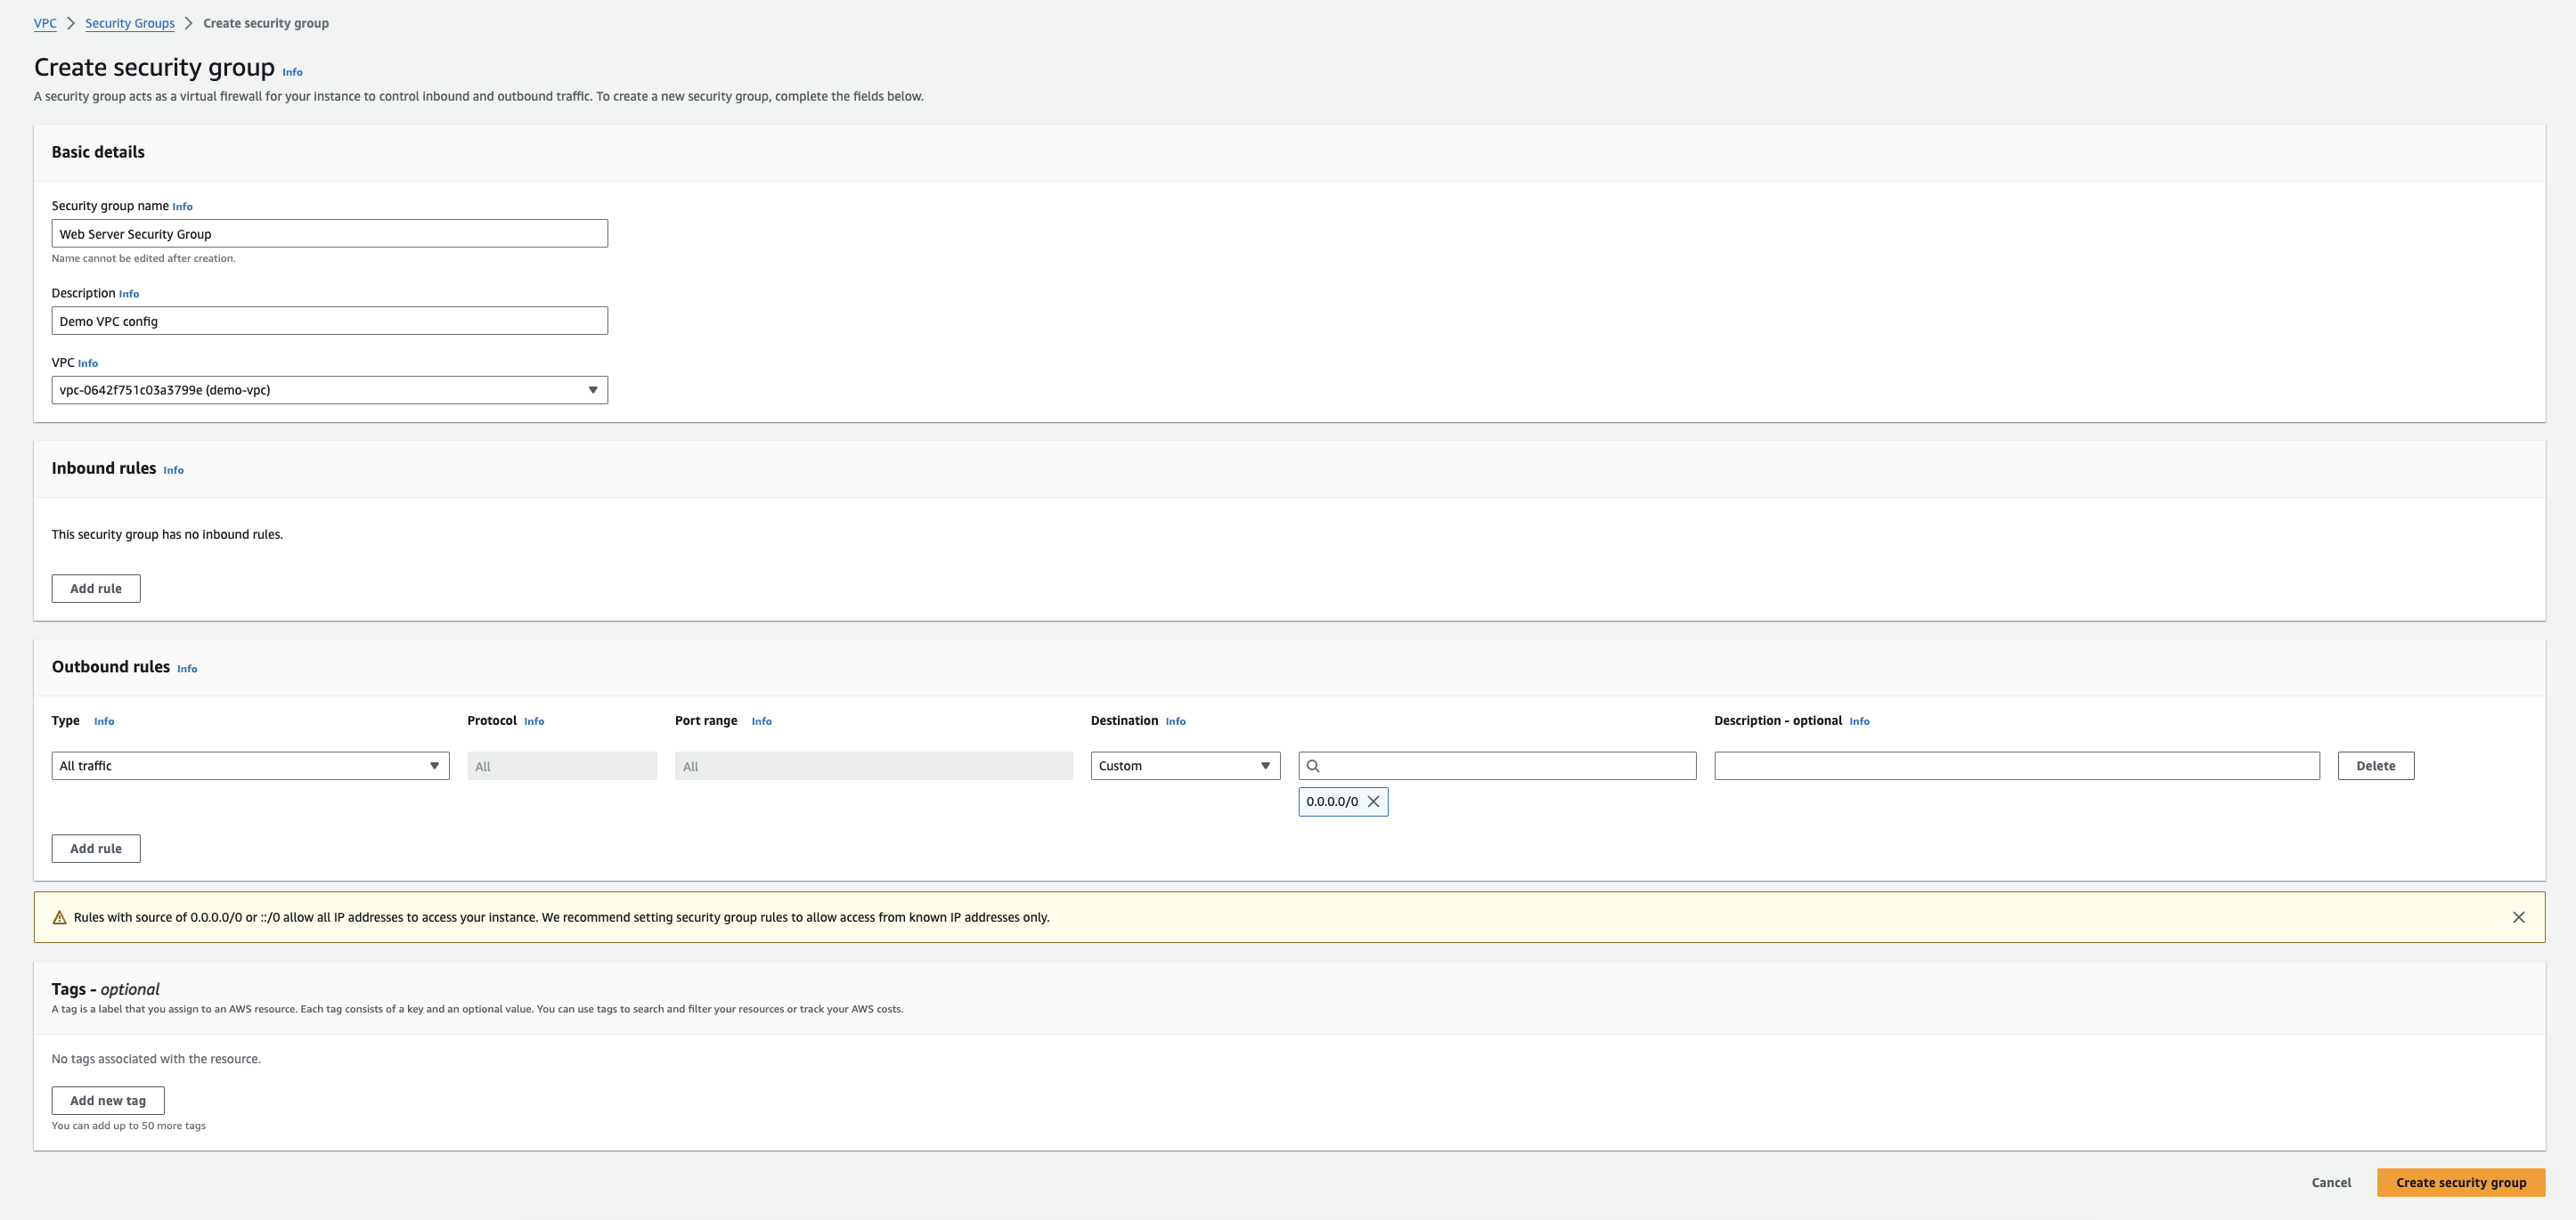
Security groups function like firewalls, controlling inbound and outbound traffic for your resources. Click on "Edit inbound rules" to define which traffic is allowed to enter your instances. For example, you might allow SSH access from anywhere (0.0.0.0/0) on port 22 for initial setup, but later restrict it to specific IP addresses for enhanced security. Similarly, configure outbound rules to specify which traffic can flow out of your instances.
5. Setting Up Routing:
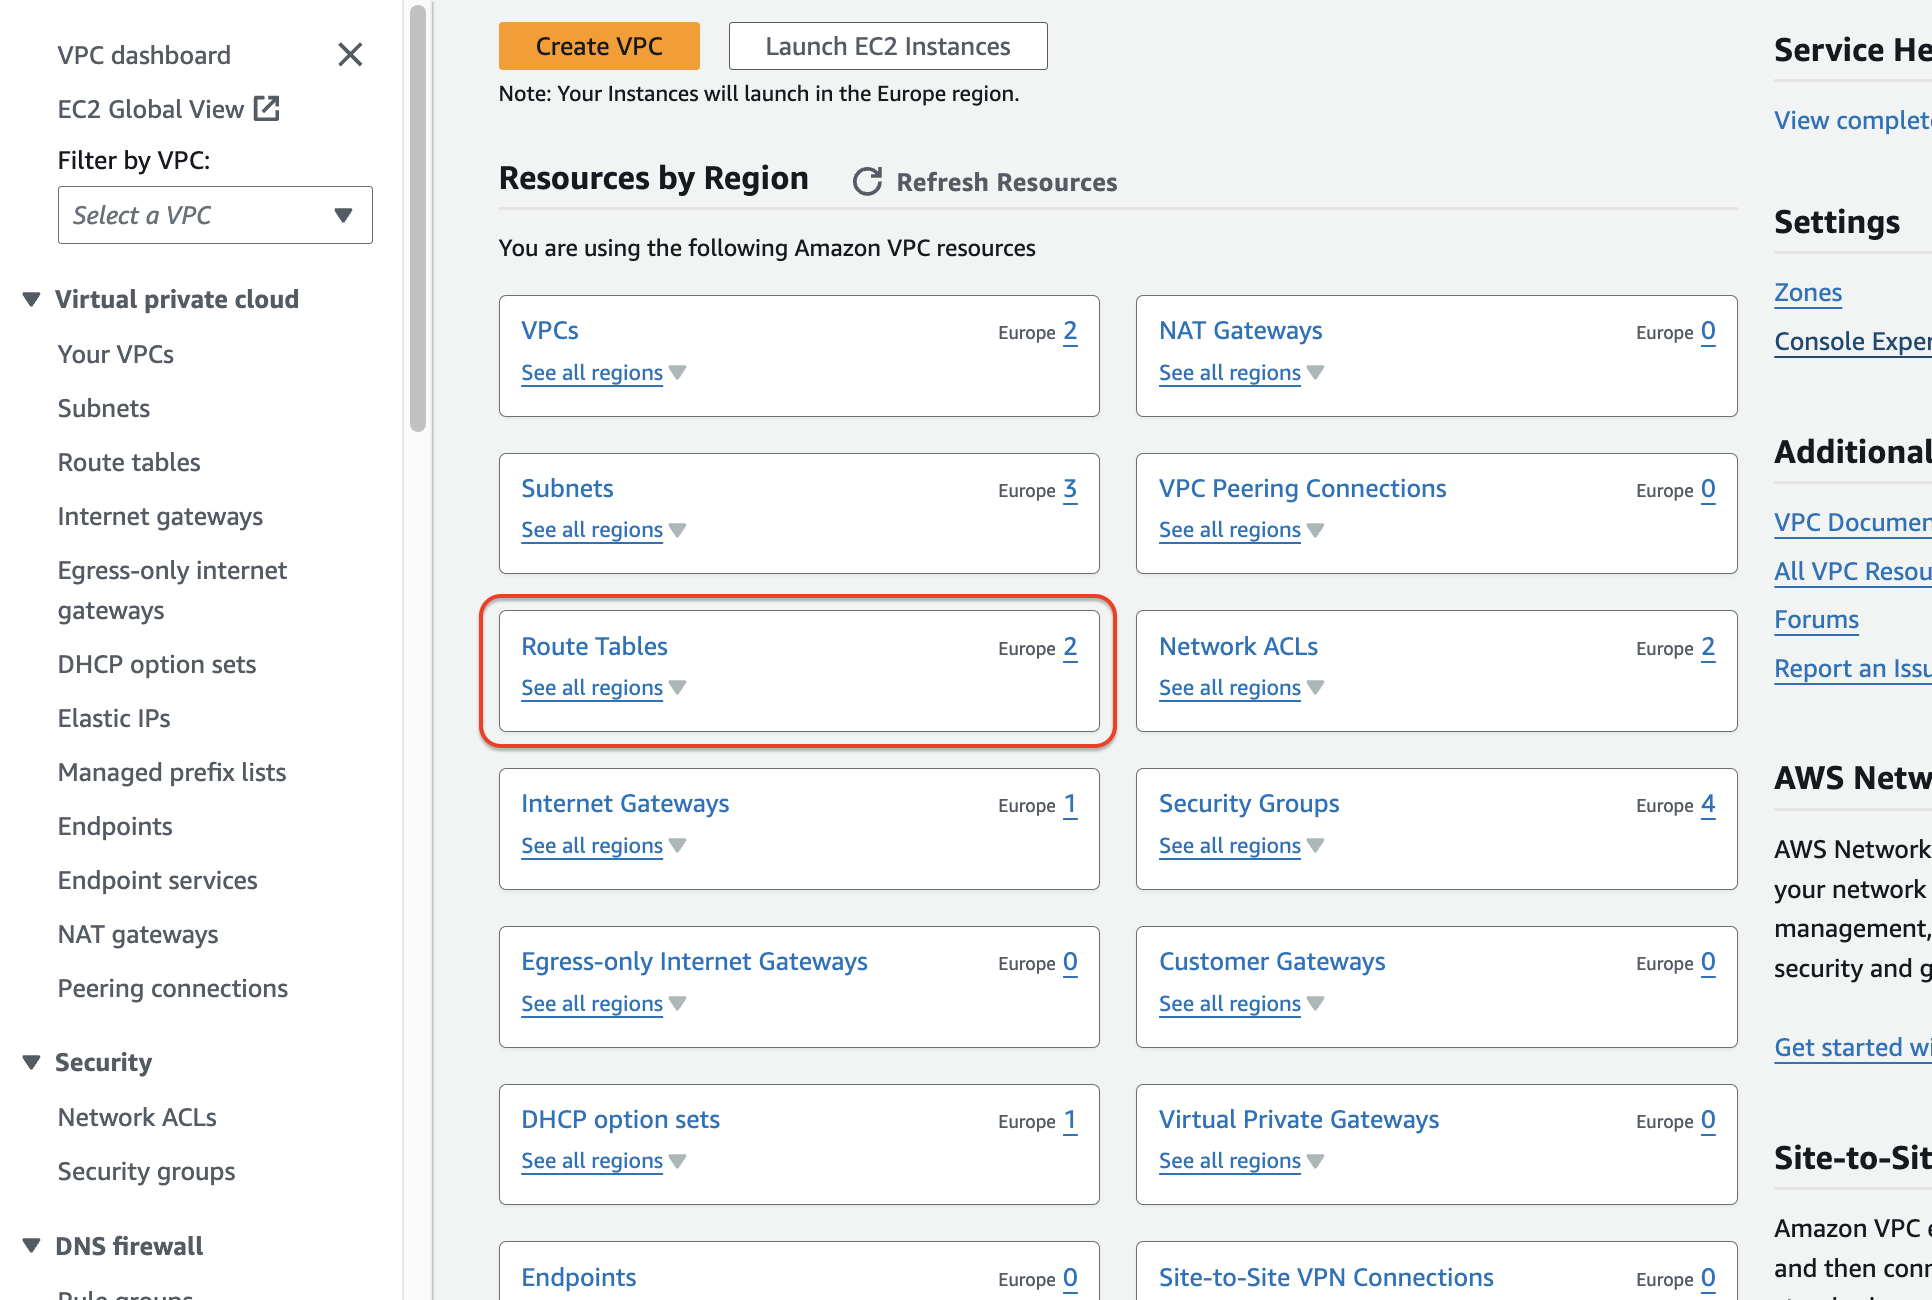
Navigate to the "Route Tables" section within the VPC dashboard.
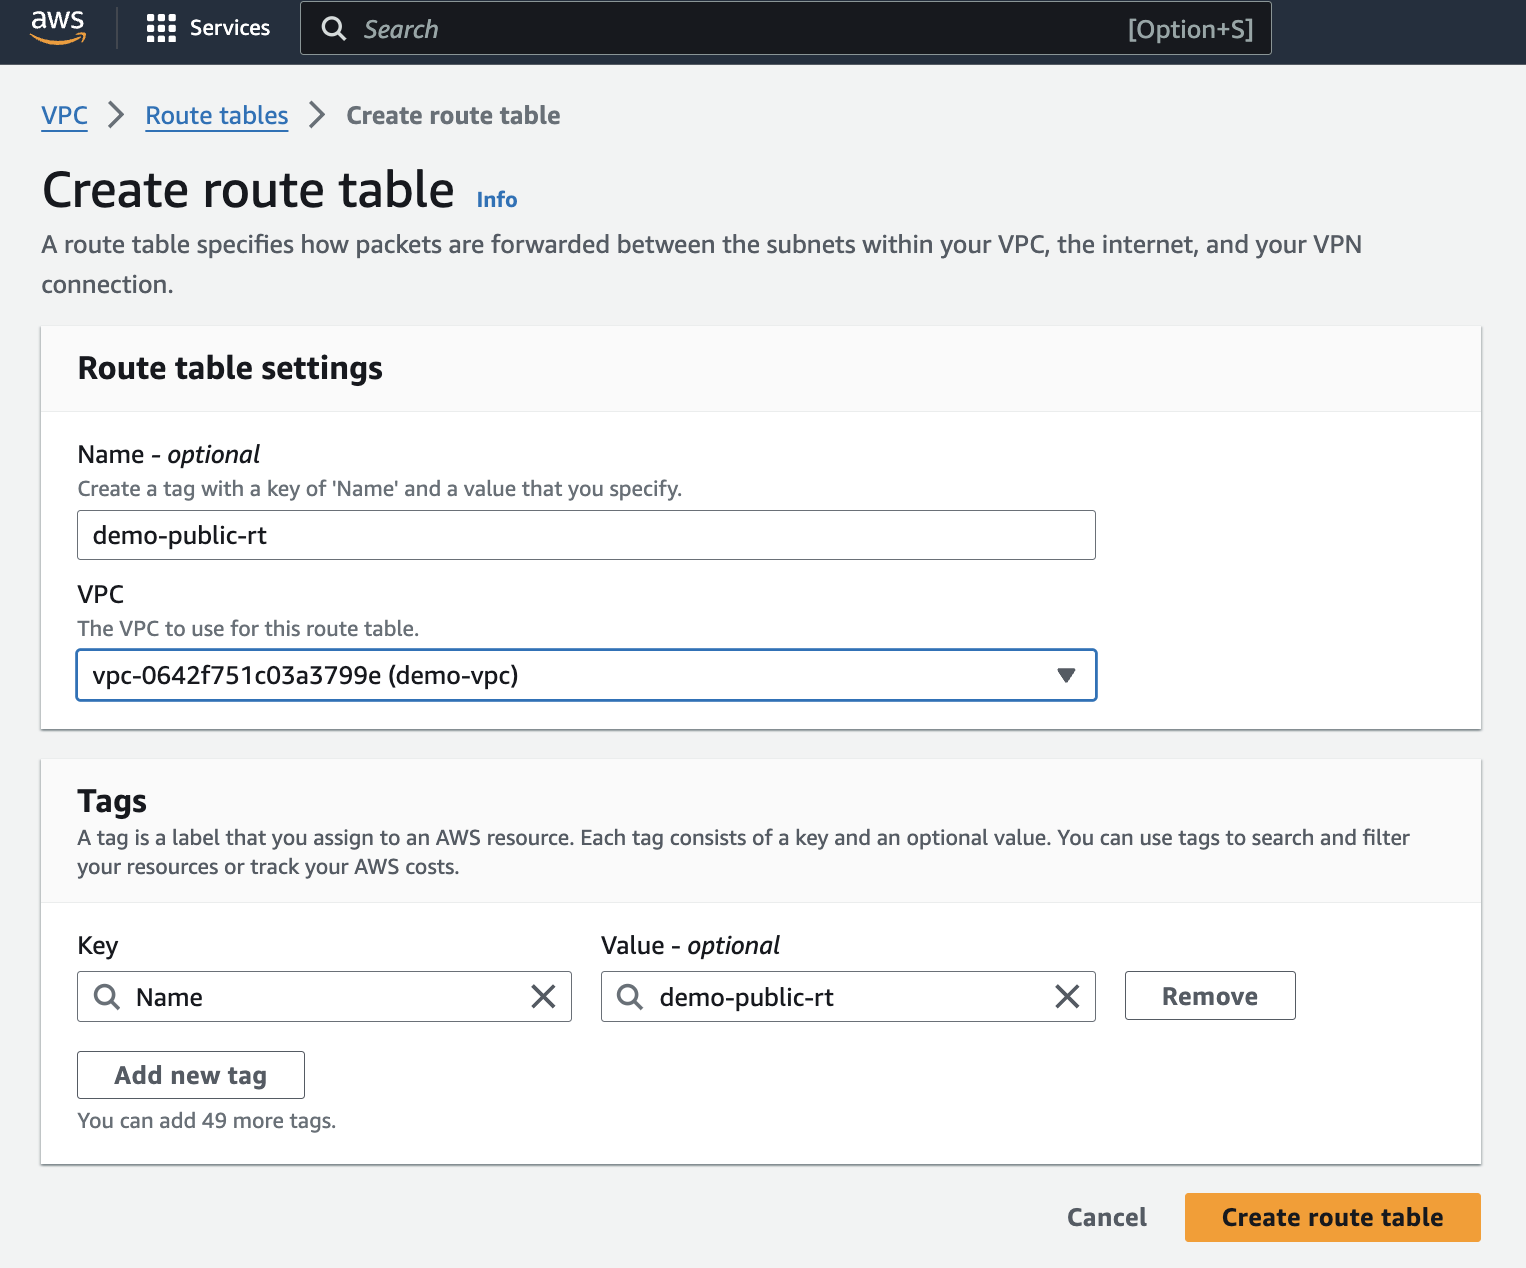
Click on "Create route table".
Assign a descriptive Name to your route table (e.g., "Public Route Table").
(Optional) Choose a VPC for the route table. By default, it will be associated with the VPC you've been working with.
Route tables dictate how traffic flows within your VPC. Click on "Routes" and then "Edit routes". Here, you can create routes to different destinations.
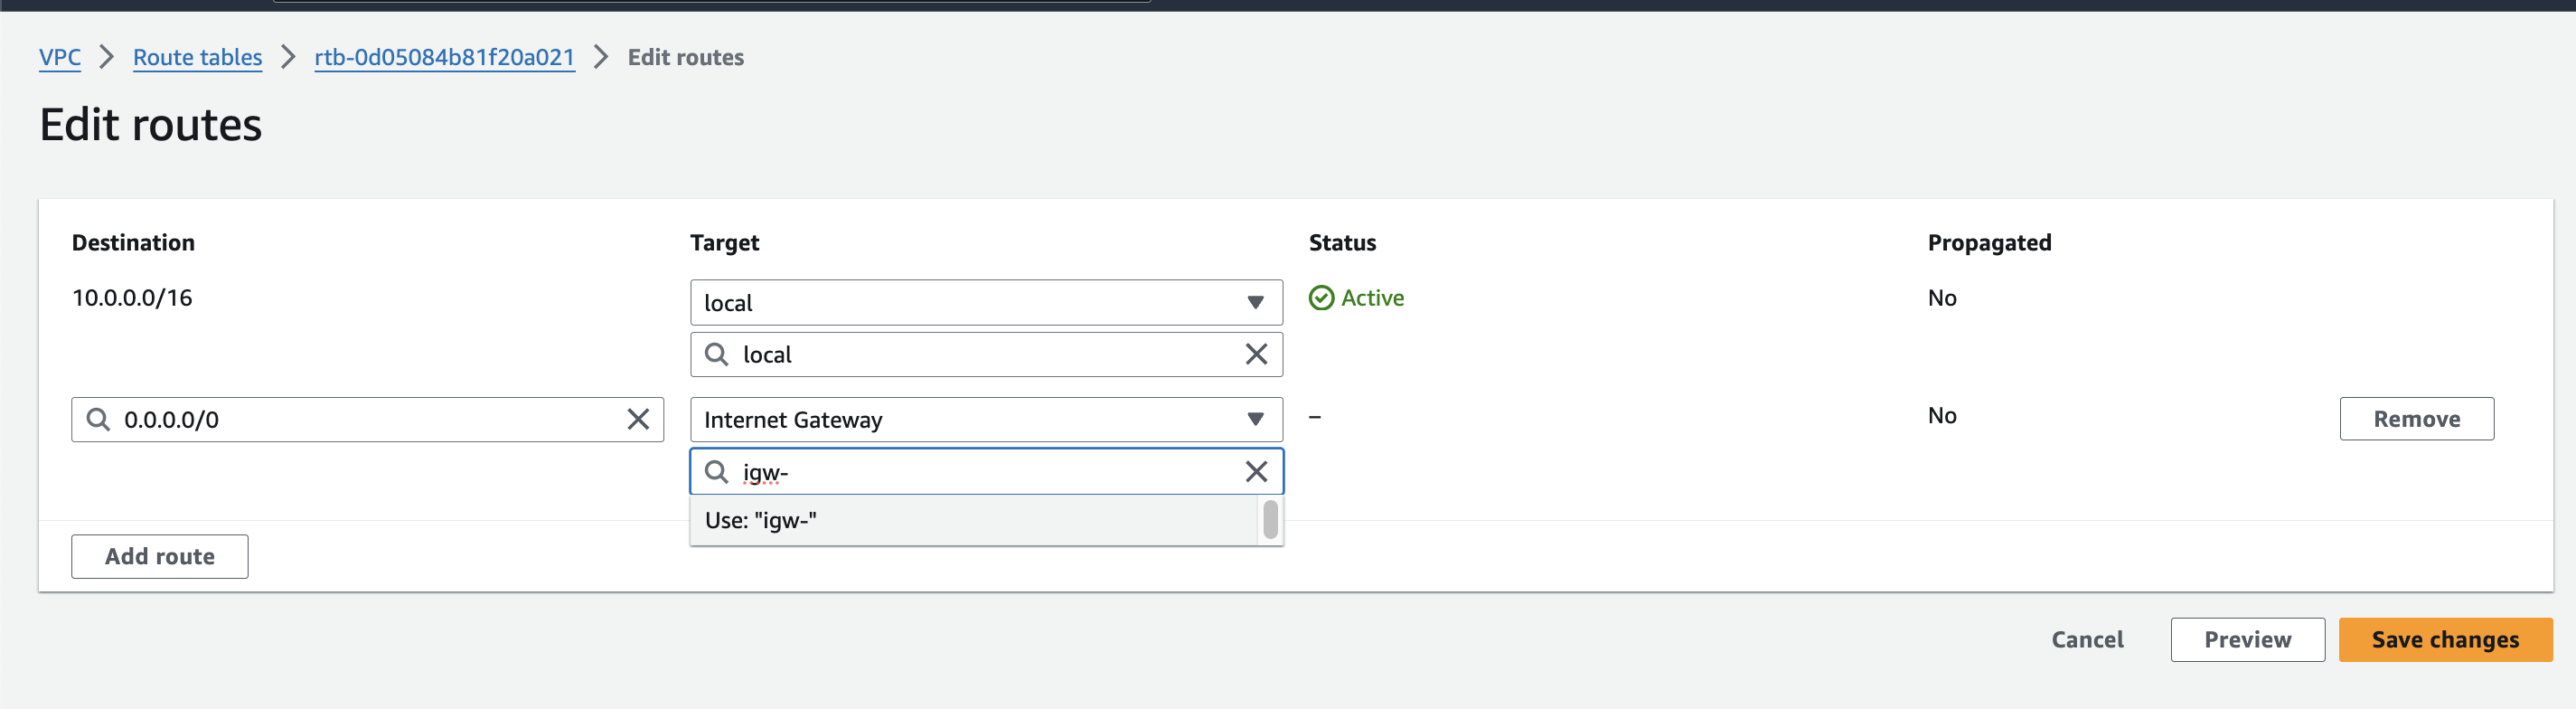
For example, add a route to the internet gateway (which you'll create in the next step) to enable internet access for resources associated with this route table.
6. Enabling Internet Access (Optional):
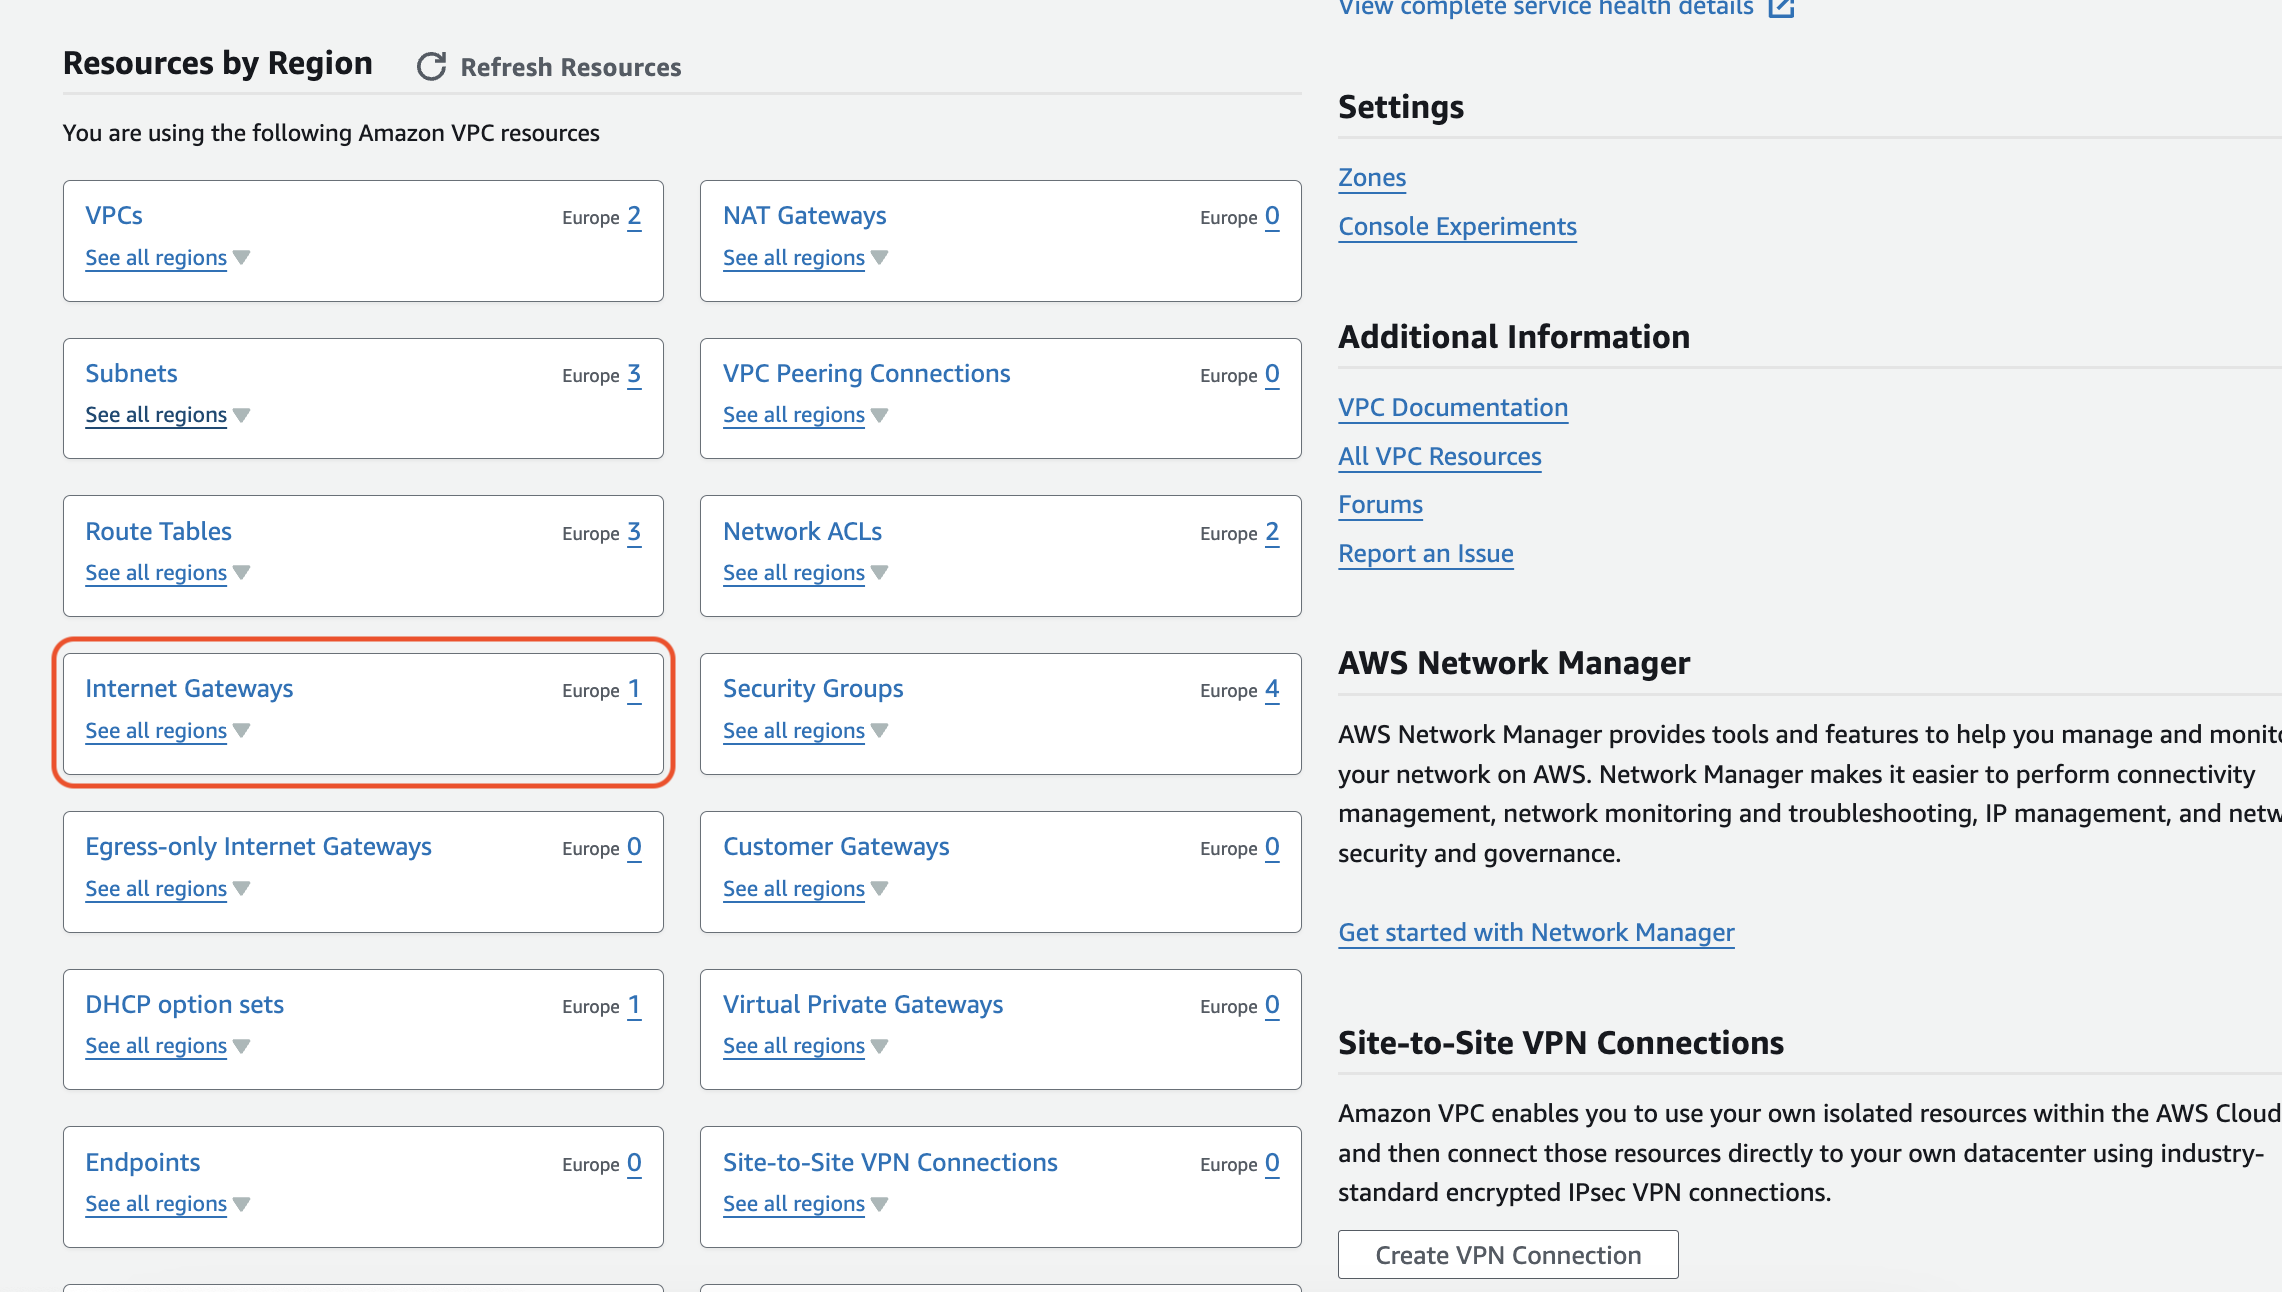
If your resources require internet access, navigate to the "Internet Gateways" section within the VPC dashboard.
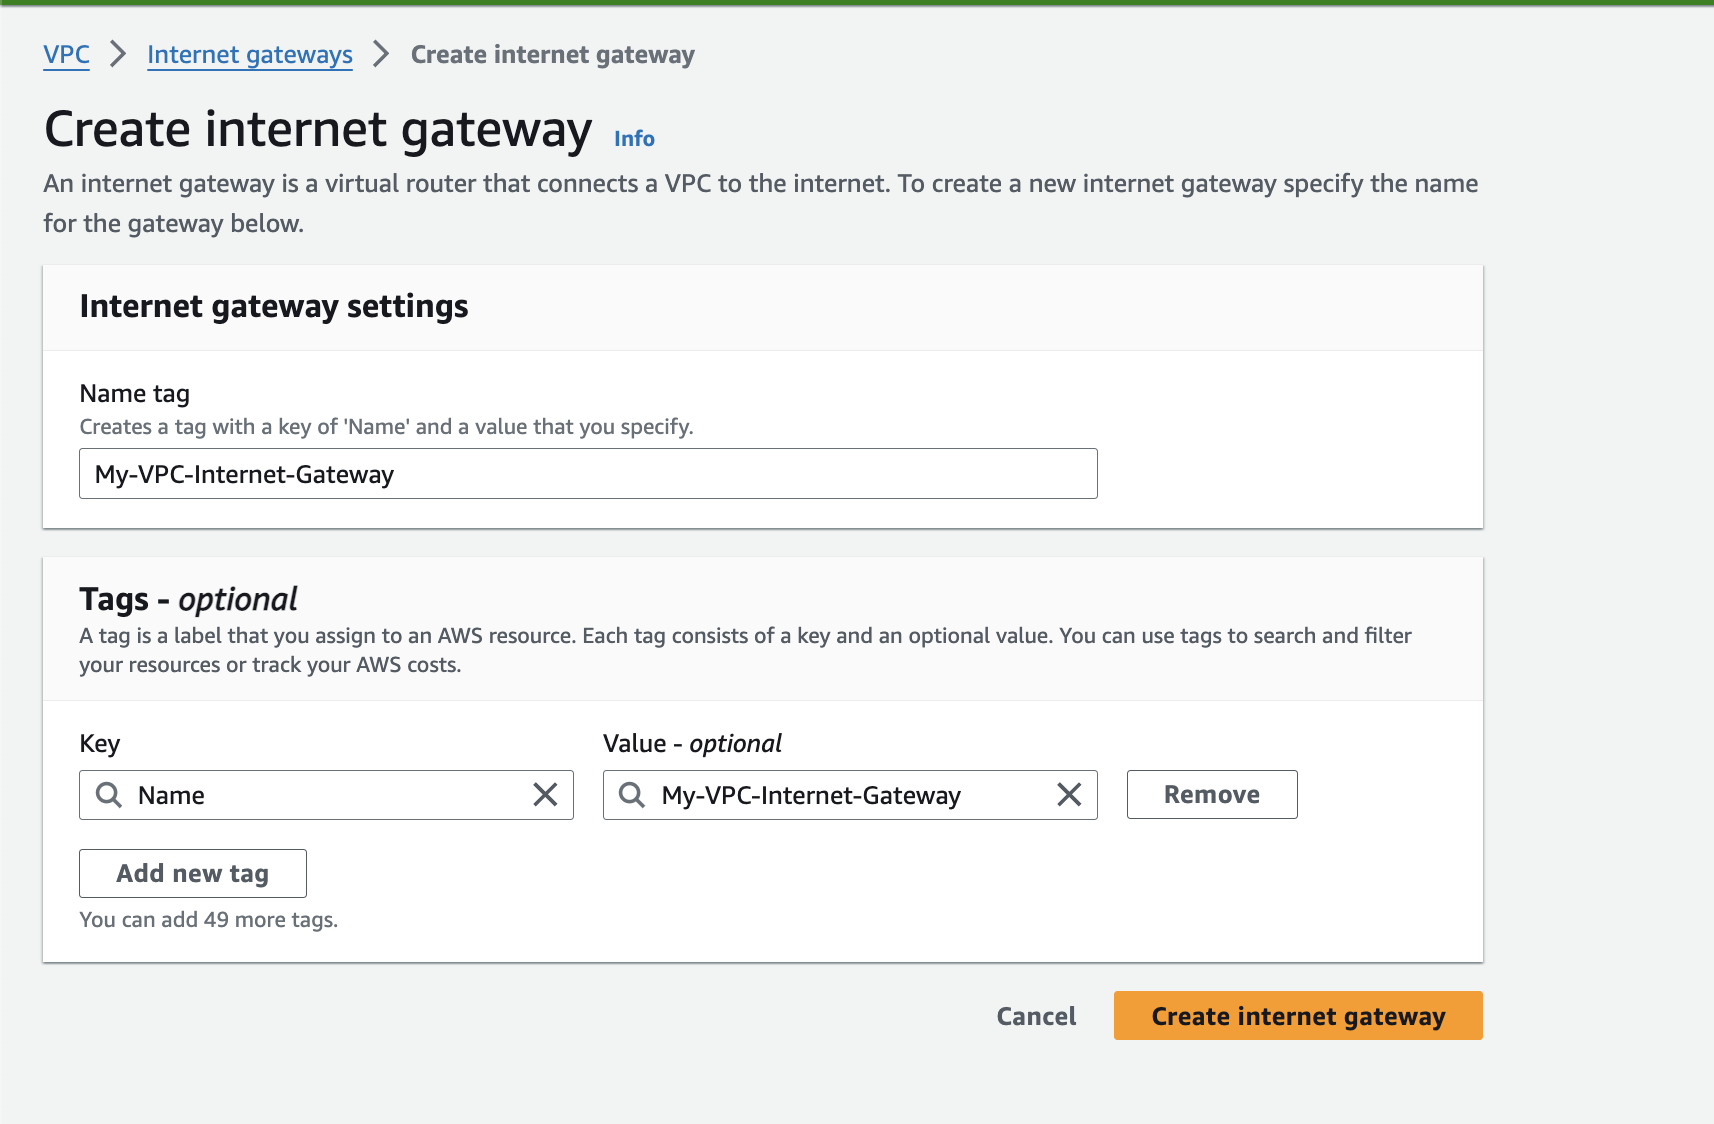
Click on "Create internet gateway".
Assign a descriptive Name to your internet gateway (e.g., "My-VPC-Internet-Gateway").
Click on "Create internet gateway" to bring it online.
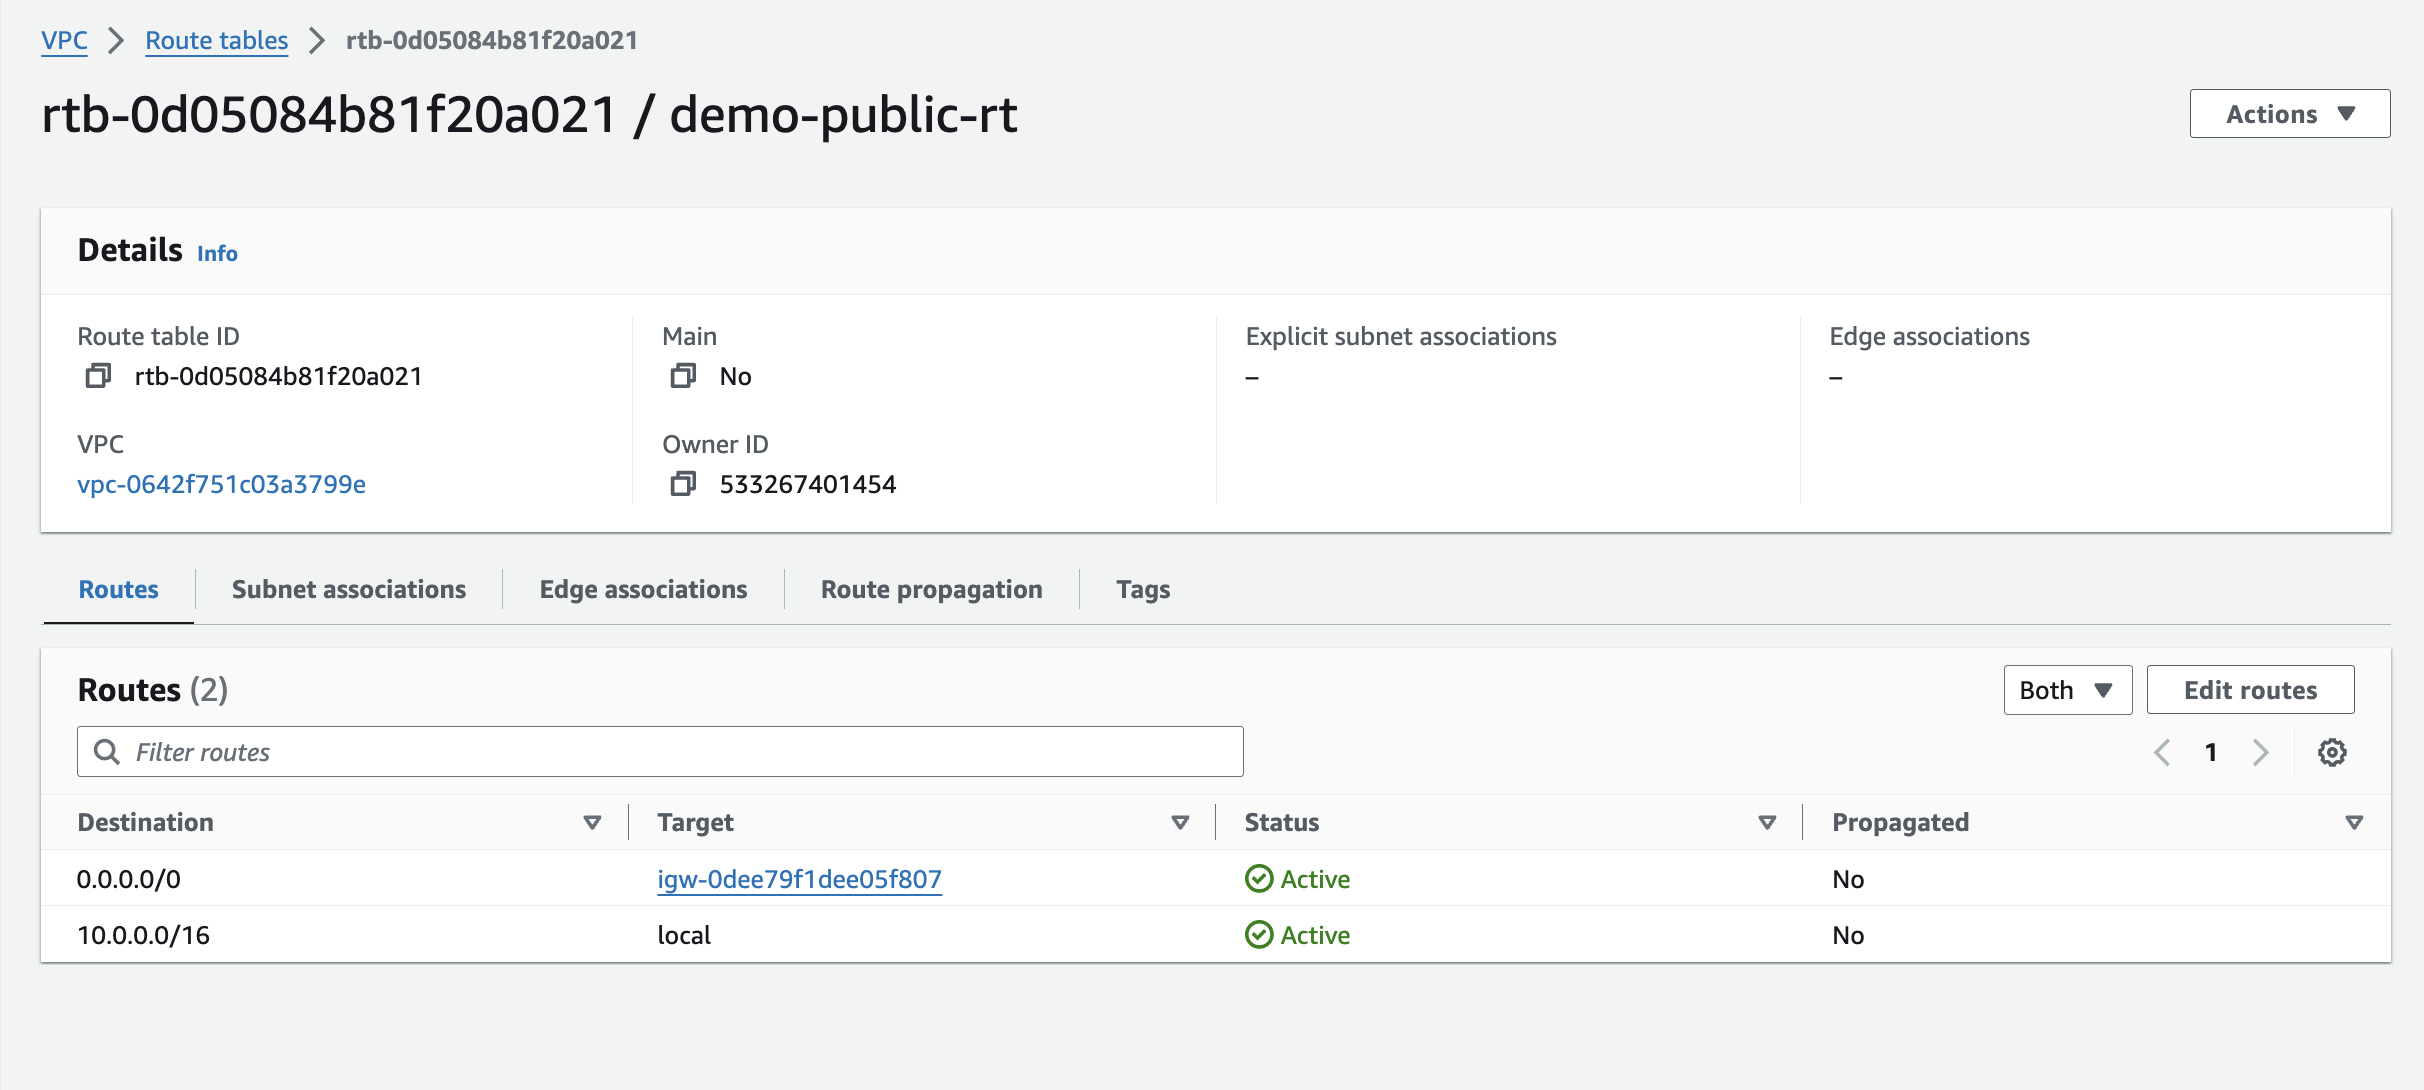
Once created, navigate back to "Route Tables" and select the route table associated with your public subnet.
Click on "Routes" and then "Edit routes".
Add a new route with a destination of 0.0.0.0/0 (representing all internet traffic) and the target set to your newly created internet gateway.
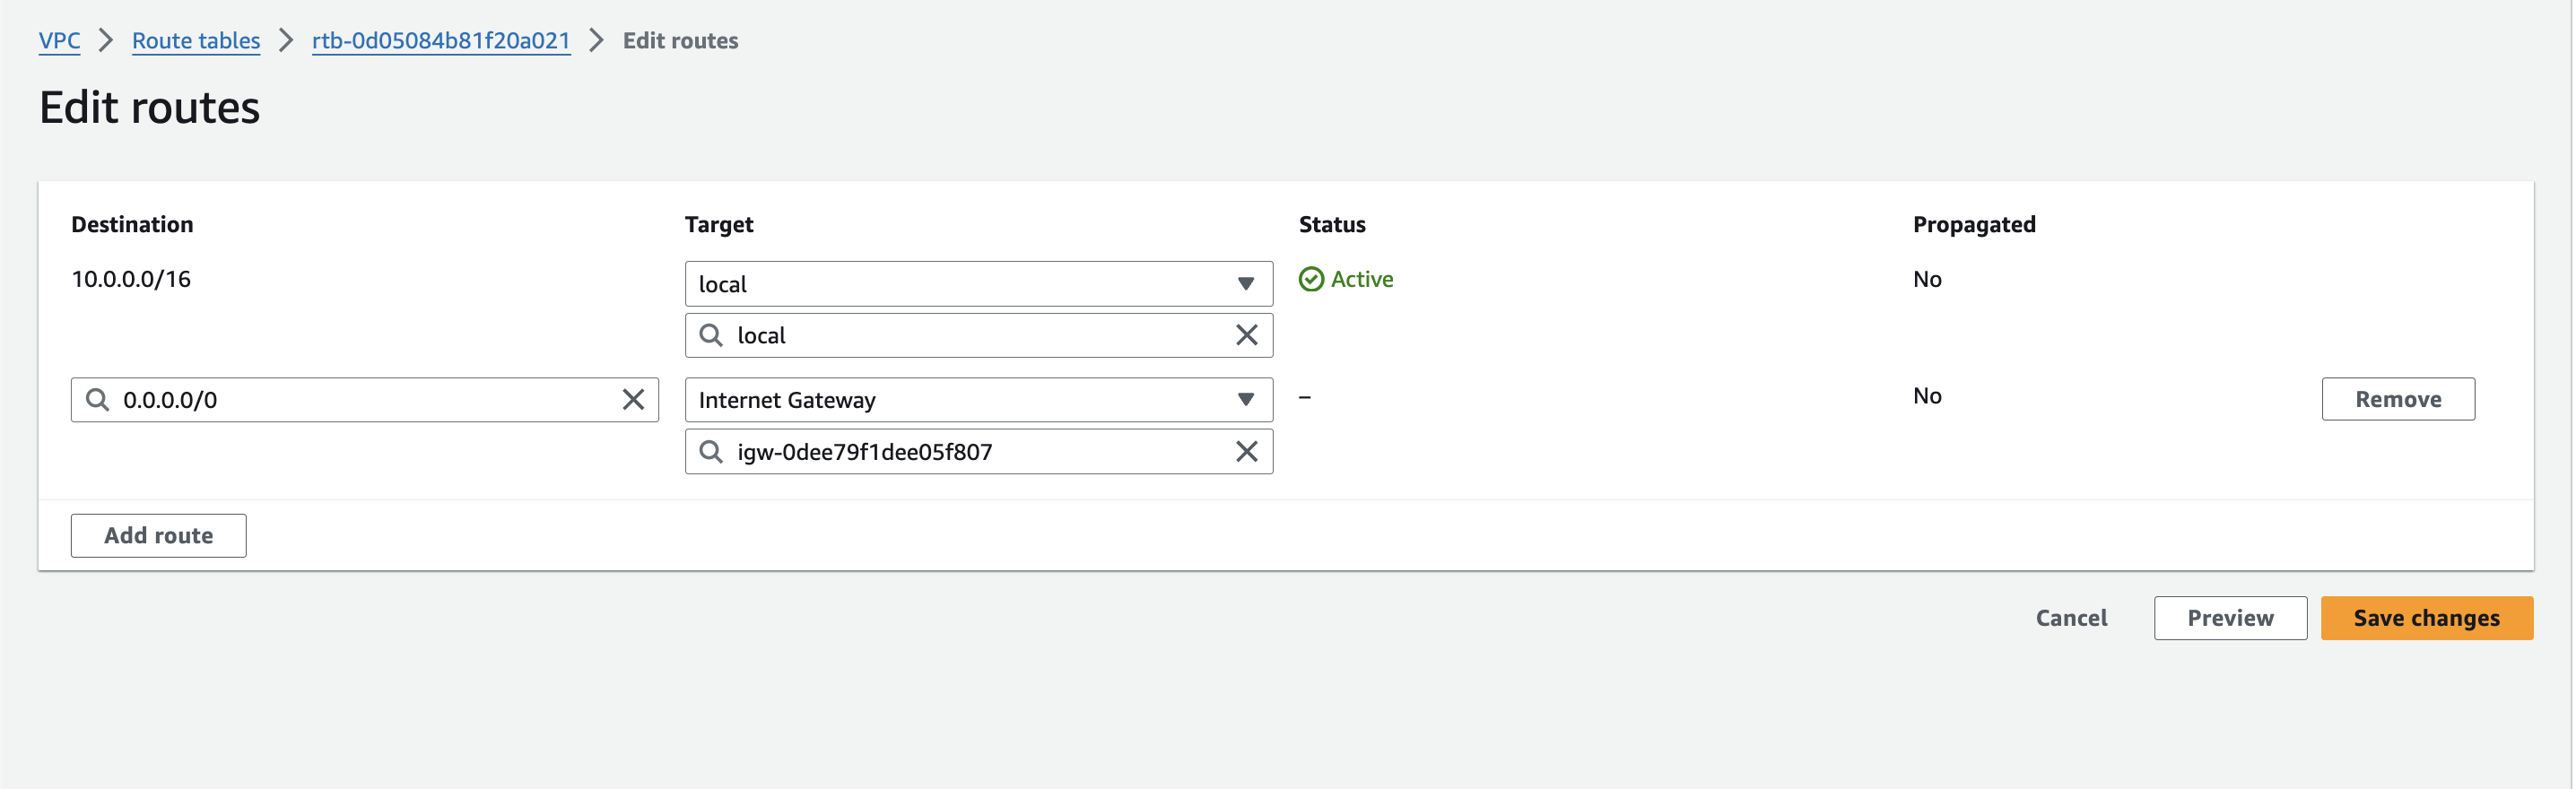
This ensures traffic destined for the internet from your public subnet knows where to be directed.
7. Associating Subnets with Route Tables:
In the VPC dashboard, navigate to the "Subnets" section.
Select the checkbox(es) next to the subnet(s) you want to associate with a route table. You can associate multiple subnets with the same route table if they share similar traffic routing needs.

Click on the "Actions" menu and then choose "Edit rout table associations".
select the route table you want to associate with the chosen subnets. This route table will dictate how traffic flows within these subnets.

Once you've selected the desired route table, click on the "save" button to finalize the association.
8. Launching Resources in Your VPC:
Now that your VPC environment is set up, you can launch resources like EC2 instances within your subnets. When launching an instance, you'll be able to specify which subnet you want it to reside in.
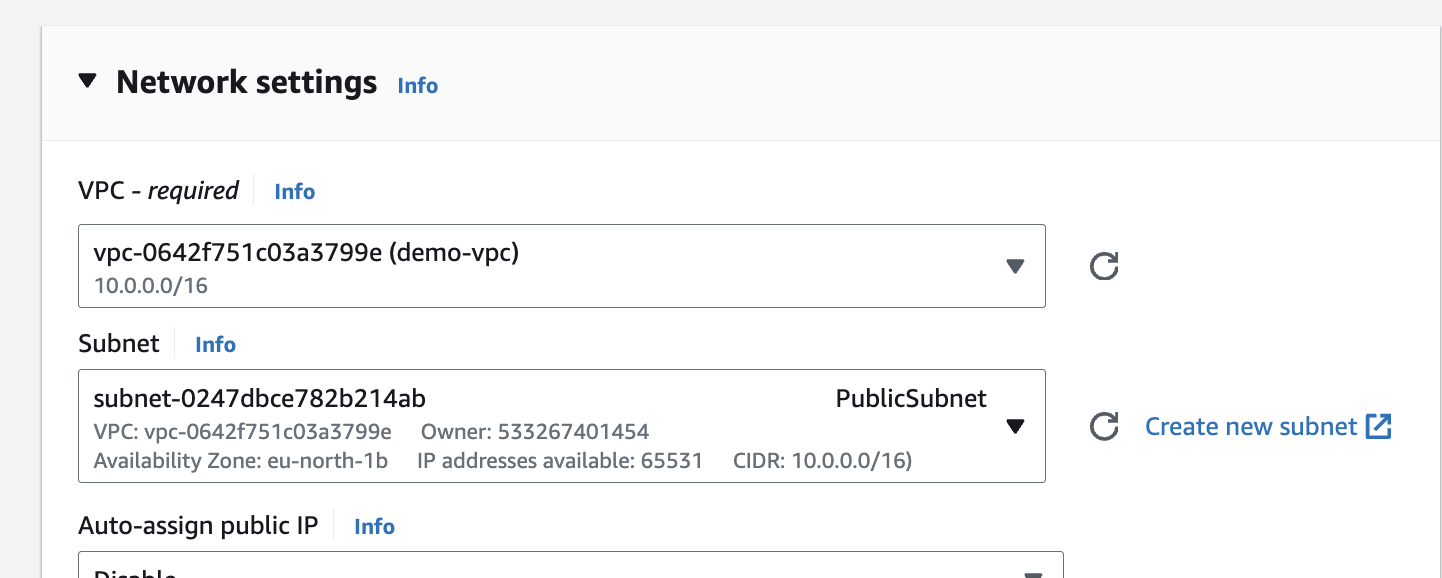
This placement influences the instance's security posture and network connectivity. For example, launching an instance in a public subnet with an internet gateway association allows it to access the internet, while an instance in a private subnet might require a NAT Gateway for outbound internet access.
Congratulations! You've successfully built a basic VPC environment in AWS. Remember, this is a foundational approach, and you can further customize your VPC with features like VPC Endpoints for private connectivity with AWS services, Network Access Control Lists (NACLs) for additional security filtering, and VPC Peering for connecting VPCs across regions. As your cloud infrastructure grows, your VPC can scale to accommodate your needs while maintaining a secure and manageable network environment.
Additional Considerations: Diving Deeper into Your VPC
While the core steps provide a solid foundation for your VPC, here are some additional considerations to explore for a more robust and secure cloud network:
1. Advanced Security: Security Groups vs. Network Access Control Lists (NACLs):
Security Groups: Offer granular control over inbound and outbound traffic at the instance level. You define rules that specify which ports and protocols can be accessed by your instances.
Network Access Control Lists (NACLs): Act as firewalls at the subnet level, filtering traffic entering or leaving the entire subnet. NACLs provide an additional layer of security and can be used in conjunction with security groups for a defense-in-depth approach.
2. Optimizing Network Access: Internet Gateways vs. NAT Gateways:
Internet Gateway: Provides a direct connection to the public internet for resources in your public subnets. This is suitable if your instances require full internet access for inbound and outbound communication.
NAT Gateway: Enables outbound internet access for resources in private subnets without exposing them directly to the internet. The NAT gateway translates private IP addresses to a public IP address for outbound traffic, enhancing security by limiting inbound traffic initiation.
3. Scaling and Connectivity: VPC Peering and Transit Gateways:
VPC Peering: Allows private connectivity between resources in different VPCs within the same region. This is useful for establishing secure communication between application tiers residing in separate VPCs.
Transit Gateways: Act as central hubs for routing traffic between multiple VPCs across regions. This is ideal for complex network architectures with VPCs deployed in various regions.
4. Advanced Traffic Management: Route Tables and Route Targeting:
Route Tables: Dictate how traffic flows within your VPC. You can have multiple route tables associated with different subnets, providing granular control over traffic routing.
Route Targeting: Allows you to define specific instance attachments to a route table within a subnet. This enables advanced traffic management scenarios where different instances within the same subnet can have varied routing configurations.
5. Monitoring and Logging:
VPC Flow Logs: Capture information about the IP traffic flowing into and out of your VPC. These logs can be used for network troubleshooting, security analysis, and cost optimization.
CloudTrail: Tracks AWS API calls, including actions taken within your VPC. CloudTrail logs provide valuable insights into user activity and potential security concerns.
By exploring these additional considerations, you can tailor your VPC to meet the specific needs of your cloud deployments
Beyond the Basics:
This blog provides a foundational understanding of VPCs. As you delve deeper, explore concepts like VPC endpoints for private connectivity with AWS services, security best practices for configuring security groups, and advanced routing configurations for complex network architectures.
Happy VPCing!
We at CreoWis believe in sharing knowledge publicly to help the developer community grow. Let’s collaborate, ideate, and craft passion to deliver awe-inspiring product experiences to the world.
Let's connect:
This article is crafted by Arnab Chatterjee, a passionate developer at CreoWis. You can reach out to him on X/Twitter, LinkedIn, and follow his work on the GitHub.